DCI DigiGuide User Manual
2026.04.25
Things You Should Know

DigiTrak LWD was formerly known as LWD Mobile and LWD Cloud was formerly known as DDM.
You must update your LWD Mobile app to DigiTrak LWD before you can continue to use the LWD Cloud account, including datalog storage and equipment subscriptions.
Visit your mobile phone's or Microsoft app store.
Search "DigiTrak LWD."
Tap Update.
When the app is installed, the icon may change based on the prior version.
The free DigiTrak Log While Drilling (LWD) app lets you transfer, view, and edit your pilot bore progress any time, right on your mobile device. With a subscription to a LWD Cloud account, you can upload your DataLog to a cloud location where other users can download, view, and annotate the job as necessary.
A job uploaded from LWD to your LWD Cloud account will automatically update a previously uploaded job of the same name. This lets you upload partial bores of increasing levels of completion for other users of the Cloud account to monitor.
LWD Cloud and an active subscription on myDCI portal (https://mydci.digital-control.com/) is the key to managing all your bore files. It provides a very efficient way to transmit data from the field to a cloud account where all stakeholders can access it immediately, anywhere on any device.
This is not a comprehensive lists of icons and symbols.
Edit. Edit LWD entries.
E-mail PDF file. This requires a LWD Cloud subscription for iOS and Android on the myDCI portal to create the PDF.
Job is locked. This job is locked and cannot be edited.
Scaling. Change the scale of a chart.
Settings. Select your units, add, or edit contractor information and view the license agreement. You can also set the number of search results presented.
Share/Create PDF. This feature requires an LWD Cloud subscription on the myDCI portal.
Sync download. Download the latest version from the cloud.
Sync Status: Job is synced. The job on the device and the cloud are the same.
Sync Status: pending. The job is in the process of being synced.
Sync Status: Unable to sync. The job is unable to sync with the cloud.
Sync Status: Unknown error.
Signed Out. You are signed out of myDCI. To create PDF reports and upload data logs, please sign into myDCI with your current account.
Signed In. You are signed into myDCI. You can create PDF reports, and data logs are uploaded to myDCI automatically.
Attention. You are signed into myDCI and there is one or more subscriptions that will expire soon. Go to myDCI to update the account.
Save as. Allows the DataLog to be stored locally on the PC.
- To zoom in and out, use the scroll wheel on the mouse.
- To pan, hold down the right mouse button and pan as needed.
Before You Start
If you are not an owner or administrator for your company, contact your company's myDCI administrator for an invitation to join myDCI.
The myDCI portal has three user roles: Owner, Manager, and User * with different levels of access.
The owner role is automatically assigned to the person creating the myDCI account. After the account is activated, additional people can be added to the account.
For more information about permissions and roles, go to the article, "Invite people to myDCI".
Go to https://mydci.digital-control.com and select Create new account.
Select Add your company.
Follow the prompts to create your account.
- Enter your company information.
- Add your name and contact information, and then select a password.
- Select your system preferences and language.
- Review the legal notice. When you scroll to the end, Accept and Continue.
Enter a valid email address or you will not be able to activate your account.
Check your email for a message from myDCI. Follow the instructions to activate your account.
You may need to check your spam folder for the myDCI account activation email.
Users can view subscriptions, equipment, and job data, and download DCI Apps.
Managers and Owners can also update subscriptions, equipment, and payment methods. They can also add, invite, or remove people.
Owners can also delete the company account, which will also cancel all subscriptions, remove access to data stored in the cloud, and delete all people. At least one owner is neededfor the company.
Before You Start
The myDCI portal is where you can register your equipment, activate warranties, and track software updates.
You can also purchase, manage, and assign your DigiTrak subscriptions to equipment to gain additional features.
Some features require that you are logged into a DCI App with a current subscription.
- In the TeraTrak R1 App, you need a current subscription for your R1 to create and share complete bore plans and to exceed the 150-foot limit between waypoints. For more information, go to the TeraTrak R1 manual.
- In the DigiTrak LWD (Log While Drilling) App, you need a personal myDCI account and a current subscription for the locator to store and retrieve logs and to create PDF reports. For more information, go to the DataLog and DigiTrak LWD manual.
If you do not have a myDCI user account, contact your myDCI administrator. If you are an owner and do not have a myDCI account for your company, go to the myDCI portal and create one.
Go to https://mydci.digital-control.com. Enter your e-mail address and password.
If you have updated the LWD App on your device or computer, you may get a message that your sign in has been redirected. Click "Continue" to log into myDCI with your current credentials.
In areas of poor mobile phone service or if you want to transfer data to your mobile device without logging in, tap "Continue" without signing in.
If log in is unsuccessful, the app will provide an option to help with a forgotten password.
Tap Settings to do any of the following:
- User Preference – select light or dark mode
- Units – change pitch, depth/distance, pressure and map coordinate units
- Job Info – view or edit contractor or customer information
- Search/Filter – Change search or filter limits
- Chart – change scaling preferences
- Export – manage PDF defaults and select a logo to display in PDF files
- Legal - view the license agreement or data privacy policy
The contractor info will then automatically be added to the PDF export.
A job marked as Complete in LWD will provide a warning if you try to upload it again. LWD users should never spend time editing a Cloud job on their computer that has not yet been marked as "Complete."
Things You Should Know
There are three roles for myDCI.
Users can view subscriptions and equipment.
Managers and Owners can also update subscriptions, equipment, payment methods, and add, invite, or remove people.
Owners can delete the company account which will also cancel all subscriptions, remove access to data stored in the cloud, and delete all people. There needs to be at least one owner for the company.
- A company can have multiple owners and managers.
- Email notifications are sent to the person making purchases and to all owners.
- A company can have up to 10 open invitations at a time. You can resend or cancel an invitation.
- You can change a person's role from their record.
- If a person is removed from your company, they will no longer be able to access your myDCI portal.
Go to https://mydci.digital-control.com, and then on the left pane, select People.
- To add a person, at the top of the page, select Send invite.
- To update a person, select their record.
If a user has not activated their account, you can resend or delete the invitation.
Enter the person's email address and select a role *.
When you are in the portal and you need help, select "Help me choose".
You will receive a confirmation email with the details of your changes. If you don't receive it within a few minutes, please check your spam folder.
All owners will receive a confirmation email with the details of any changes made of the account.
Users can view subscriptions, equipment, and job data, and download DCI Apps.
Managers and Owners can also update subscriptions, equipment, and payment methods. They can also add, invite, or remove people.
Owners can also delete the company account, which will also cancel all subscriptions, remove access to data stored in the cloud, and delete all people. At least one owner is neededfor the company.
Things You Should Know
- You must have an owner or manager account to add or update equipment records.
- Select an item from the equipment list to view or edit its details or assign a subscription to it.
- Equipment details
- Name, model, serial number, and friendly name
- Options
- Rename this piece of equipment
- Report equipment as stolen (Ares locators only, subscription required) Go to the article, "Track your Ares locator or mark as stolen" for more help.
- Delete equipment
- Subscriptions
- Assigned to a specific piece of existing equipment. Go to the article "Manage subscriptions on myDCI" for more help.
- If you remove equipment with an active subscription, the subscription can be reassigned to another compatible item.
- Software (Ares locators only)
- The current software version and notice of any software updates. You cannot update a locator remotely. Go to the article in the Ares manual, "Update the Ares locator software over Wi-Fi" for more information.
- Warranty
- Track your warranty expiration date
Go to https://mydci.digital-control.com, and then on the left pane, select Equipment.
- If this is your first piece of equipment, select the big button to add it.
- To add additional equipment, in the Equipment summary box, select +Add new.
In the upper right corner, select +Add Equipment.
- or -
On the List tab, select equipment to view or update it (identified by brand, model, and serial number).

Enter the serial number and give it a unique name. This will make it easier to identify later. For example, "Blue Crew."
Enter the purchase date of the equipment and the dealer to determine the warranty status.
After information provided is validated, you will get the success message with the warranty information.
- If a related subscription is available for this equipment type, you can purchase it now and assign it to this piece of equipment. For more information on subscriptions, go to the Manage subscriptions on myDCI article.
- You can Add more equipment.
- Click Close to view the Equipment details page.
If you do select a subscription for this equipment, don't forget to go to the cart and complete the purchase.
Unless you purchase a subscription at the same time as adding the equipment, you will not receive a confirmation message.
Things You Should Know
DCI Subscriptions offer additional features and services to DigiTrak equipment. For example, an R1 subscription is required for extended bore planning and an LWD Cloud subscription is required for LWD data cloud storage.
- A subscription is assigned to a specific piece of equipment. You can add equipment before buying a subscription from the Equipment.
- If you remove equipment with an active subscription, the subscription can be reassigned to another compatible item. Go to the article "Add equipment to myDCI" for more help.
- Subscriptions are set to auto-renew so that you never lose access to your data or subscription features. To turn off auto-renewal go to the Subscriptions and select Cancel Subscription.
- To update the payment method, at the top of the list of subscriptions, select Billing and Payments.
Go to https://mydci.digital-control.com, and then on the left pane, select Subscriptions.
- If this is your first subscription, select the big button to add your first subscription
- To add additional subscriptions, select +Add. Select the subscription
Select from the list of available items, and select Add.
If you have a promotion code, enter it at the bottom of the form, and select "Add." If a promotion code has expired, you can purchase the subscription from the list.
R1 subscriptions require a free promotion code.
R1 subscriptions can be obtained by submitting this form or contacting DCI Support.
Review the list in your cart, and then you can:
- Save and checkout later.
- Save and add another item.
- Go back to change an item.
From the drop-down list, select the equipment (identified by make, model, and serial number). Some items may have a unique name to make it easier to identify.
To use a subscription feature, such as LWD Cloud storage, you will need to purchase a separate subscription for each piece of equipment. Not all subscriptions go with every type of equipment.
- To assign or reassign a subscription to equipment, select the item.
- Select Assign or Reassign.
- Select the equipment from the drop-down list, and then Save.
- Expired subscriptions cannot be renewed. Purchase a new subscription.
- To cancel or turn off the automatic renewal for a subscription, select the item, and then select Cancel subscription.
After the subscriptions expiration date, no one in your company will have access to the subscription's features and services. However, a new subscription can be purchased at any time.
You will receive a confirmation email with the details of your changes. If you don't receive it within a few minutes, please check your spam folder.
Before You Start

You can record real-time, rod-by-rod bore data from your locator and annotate the data with on-site obstacles and utilities.
After completing your bore, you can transfer the data files to your DigiTrak LWD app on your mobile device or Windows computer.
For the secure transfer of your files, the locator and the signed in user of the DigiTrak LWD App must be registered to the same company account on the myDCI portal. A myDCI company account is free and with an additional LWD Cloud subscription you can also store and share files with other registered users in your company.
For more information about myDCI portal, go to the myDCI Cloud Services manual in the DigiGuide App.
For the most accurate GPS data:
- Position the locator as high as possible. You could use a surveying tripod. The locator saddle is compatible with many tripod couplings. Remember to set the HAG for the tripod height.
- To take a depth reading, place the locator at the LL and step away from the locator. Do not move the locator for at least 5 seconds. This allows the locator to lock in the GPS signal. Select Log point.
Falcon Users - DataLogs are now called bore logs in LWD and Ares.
From the Home screen, select Jobsite setup.
You can also create a bore log from any Depth screen or the Max mode screen when you try to log a data point without an active log.
On the Jobsite setup screen, select Bore log and then select Create new log.
On the Create new log screen, you can rename the log and use Edit to change the default log parameters, before you select Create log.
On the LWD App, you can use GPS to mark this as the entry point.
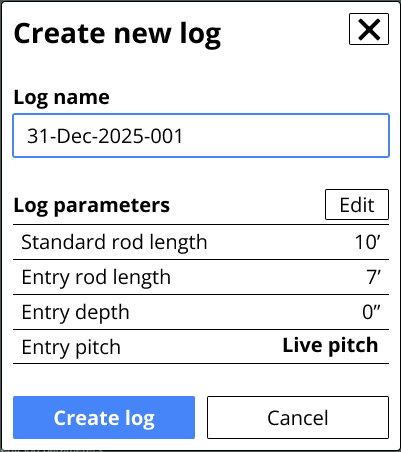
To create a new bore log, the locator needs either live pitch data from the transmitter or you need to edit the log parameters to enter the starting pitch (Rod 0) manually.
To change the default parameters for logging, go to the "Home" screen, select "Jobsite files", and then select "Log Defaults."
Falcon Users - The Ares does not collect the entry point with GPS.
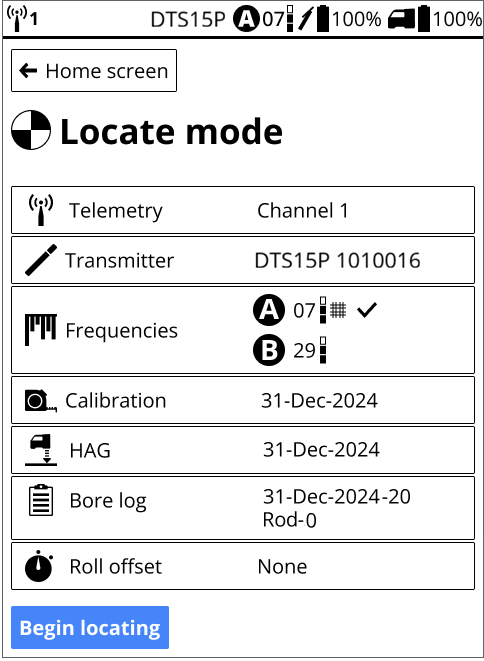
On the Log created page, select Begin locating.
Because this is a new job, the locator displays the current settings, the active bore log.
To view these settings at any other time, from the Home screen select Jobsite setup.
The locator turns off bore logging when the locator is powered down. When you resume locating, you can resume the bore log or start a new one.
To log your first rod, select Begin locating.
Every time you take a depth reading, you will have the opportunity to log the rod and add any utilities, flags, pins, or notes. For more information, see the article Log data on an Ares locator in the DigiGuide App.
Before You Start
The LWD (Log-While-Drilling) feature on the Ares locator records data and transfers data to the DigiTrak LWD App on your mobile device or Windows computer to create customer-ready reports for your completed jobs. A free company account is required on the myDCI portal to transfer files between the locator and the LWD App. An additional LWD Cloud subscription on myDCI portal is required to share and store data in the cloud.
This article assume you have already started a new bore log job file.
For each rod, you can log:
- A depth and pitch reading for the transmitter
- A pitch only reading
- A partial rod
- A blank rod (no depth or pitch data is available, or the location is questionable)
- A utility on the bore path, including utility type, location, depth, and diameter
- Flags to mark landmarks or points of interest on the bore path
- Pins to mark landmarks or points of interest to the left or right of the bore path
- The offset to specify a horizontal distance that you are logging from a feature to the left or right of the bore path, such as a curb or fence
- The deviation to specify how far the drill head is deviating from the intended bore plan
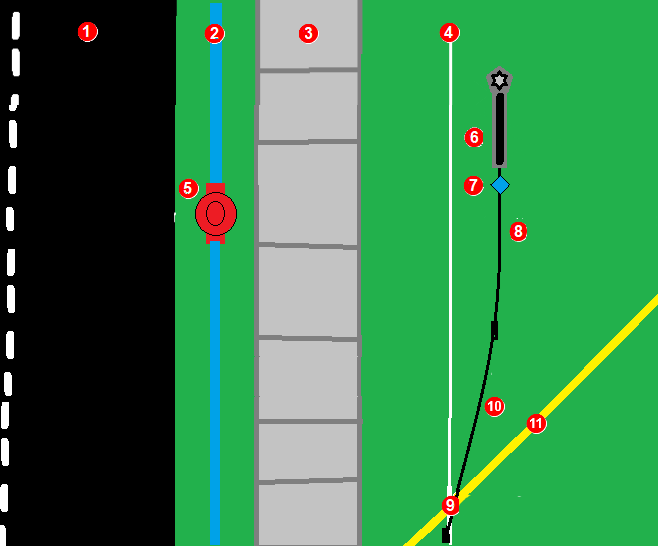
- road
- water line
- sidewalk
- planned bore path (white line)
- fire hydrant
- deviation to the right from planned bore path
- pin marking hydrant left of bore path
- rod 3 (black line)
- Utility marker for gas line on bore path
- rod 2 (black line)
- gas line (yellow line)
For the most accurate GPS location data, raise the locator on a stand, such as a surveying tripod. The locator saddle fits most standard tripods.
Falcon Users
LWD has not changed much since Falcon, but there are some differences to be aware of with LWD for Ares.
- The bore path's entry point (Rod 0) is recorded as soon as you create the DataLog (now called a bore log) file.
- Utilities are a separate marker from flags. Include clearance when you define the diameter.
- Pins and offset are left or right of the drill head with the drill rig behind you. This may be different than you were taught with a Falcon locator and LWD.
- Deviations are left or right of the intended bore path, with the drill rig behind you.
- Offsets are left or right of the bore head with the drill rig behind you.
- The bore log list is from top to bottom, with the most recent rod at the bottom.
On the Locate mode information screen, make sure that Bore log is on and that the correct job file is active, and then select Begin locating.
If you need to Create a new log, see the article Start a new bore log job file.
Drill the entry Rod 1 into the ground. Log a data point at the end of every rod. If using GPS logging should be done at the LL. If GPS is not important it can be quicker to log each rod at the FLP.
To record a data point and its annotations, position the locator at the LL (for GPS data), and select Depth.
If there isn't a signal, use Max mode * or take an estimated depth.
To record a blank rod or pitch only use the estimated depth mode if the LL or LP is not convenient. To add a utility or other annotation it is not necessary to be at the LL or LP, use the estimated depth mode.
For the most accurate GPS data, position the locator on the LL and step away from the locator. Do not touch the locator for at least 5 seconds. This allows the locator to lock in the GPS signal. After the short wait, you can take a depth reading and log the rod.
Before you log the depth and pitch as a data point, log any flags, pins, or utilities. Any flag, pin or utility MUST be recorded before you log the Depth and Pitch. Skip this step and add the notations. Deviations and Offsets are saved with rod depth and pitch.
On the Depth screen, select Log data point.
If there isn't an active log, you can create a new log or resume an existing log.
The Log point screen displays the data to log. If there is no depth or pitch data available, log a blank rod or edit the log parameters to log a partial rod.
Before saving the data, select the three-dot icon to open the Log parameters screen and edit the parameters and add any additional information, such as partial rods, utilities, flags, or offsets.
To log a utility for this rod
- On the Log Point screen, under Log other, select Utility.
- On the Utility screen, enter the details:
- type of utility (phone, water, fiber, etc.)
- location of the utility from the start of the rod (the LL of the previous rod)
- depth (option to measure from top, center, or bottom of the utility to the ground surface)
- diameter of the utility including the clearance that you want to use
- Select Save.
The utility is logged, but not the rod. - On the confirmation screen, select Go Back to return to the Locate mode screen, and add additional annotations or log the depth and pitch for the rod.
To log a flag or pin for this rod
- On the Log parameters screen, select Flag if the point of interest is on the bore path.
- OR -
Select Pin if the point of interest is on either side of the bore path. - On the detail screen enter the position of the flag or pin along the rod. For pins, you should also note how far the point of interest is from the bore path to the right or left. Measure from the point of interest to the center line of the locator.
- Select Save.
The flag or pin is logged. - On the confirmation screen, select Go Back to return to the Locate mode screen, and add additional annotations or log the depth and pitch for the rod.
Flags and pins are named and logged sequentially. You can edit the bore log in the LWD App to give it a more descriptive name.
Offset can be turned on or off and adjusted to different distances at any rod number. For example, a curb offset may start at rod 7 at a distance of 3 m left and end on rod 27. A new offset of a road edge may start at rod 50 at 1.5 m right and last to the end of the bore.
To use an offset for this rod
Specify a given horizontal distance you intend to maintain from a
feature beside the bore path, such as a curb, guardrail, or surveyed path.
- On the Log Parameters screen, select the distance from the bore path to the feature you wish to follow.
- Select if the offset is to the left or right of the intended bore path.
- Select Save.
The offset is logged. - On the confirmation screen, select Go Back to return to the Locate mode screen, and add additional annotations. If you select "End log" or the locator times out before you log the rod, the annotations will not be saved with this rod.
To record a deviation from the planned bore path for this rod
You mark how far the drill head is deviating from the intended bore path.
- On the Log Parameters screen, select the distance from the planned bore path.
- Select if the deviation is to the left or right of the intended bore path facing away from the drill rig and the distance from the center of the locator to the planned bore path.
- Select Save.
The deviation is logged. - On the confirmation screen, select Go Back to return to the Locate mode screen and add additional annotations. If you select "End log" or the locator times out before you log the rod, the annotations will not be saved with this rod.
A best practice to confirm exact position of an LWD log point is to always have deviation ON and set to 0. Change the deviation when the drill head is not at zero deviation.
To log a partial rod
- On the Log parameters screen, select how much of the rod to record (1/4, 1/2, 3/4, or full)
- Select Save to return to the Log point screen.
The button is updated with the Rod number with the partial rod as a decimal. 5.5 is the half of the 5th rod.
If a utility is added to a partial rod. Measure the distance from the start of the second half of the rod.
You cannot add details to a rod such as utility, flags, and offsets after you log the rod. Add the notations one at a time before logging the rod (full or partial).
After you have selected and entered all of the data for this rod, including if it is a full or partial, select blue bar with the rod number to log the rod.
All annotations entered will be applied to this rod.
The Rod logged confirmation page displays the data logged. Click Go back to return to Locate mode and continue locating.
If you select "End log" or the locator times out before you log the rod, the annotations will not be saved with this rod.
To view the log file, go back to the "Home" screen and select "Jobsite files", and then select the jobsite file. You can view the log summary or the rod-by-rod detail. To make corrections to a completed log, transfer the log file to the LWD DigiTrak App.
To create a new log, you need to end the active log. You can do that from any LWD screen with an End log button. The active log will also end when the locator is powered off.
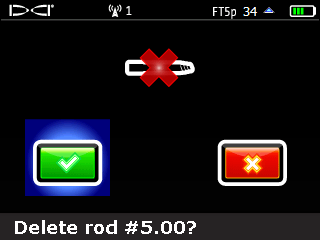
To delete a rod
If one or more rods were pulled back or accidentally recorded twice, you can delete the most recent rod entry in the bore log.
- On the Log point page, select View full log.
- On the Log detail screen, select the Rod detail tab
- On the bottom of the screen, select Delete rod.
You can only delete the most recent rod entered. - On the confirmation screen, select Delete. This cannot be undone.
On the Rod detail screen, you can delete additional rods one at a time from the most recent entered.
Make sure that the number of rods deleted match the number of rods pulled back.
Max Mode can stabilize roll/pitch data and depth readings when drilling at the transmitter’s range limit due to extreme depth or interference, which will vary by jobsite. See the Max Mode topic for use and important safety information.
From the Main menu, select Drill DataLog.
If this icon is red, select to enable DataLog (green).
If this icon is green you can set up a job directly from the Locate screen by holding the trigger and toggling right.
Select Set up job.
Select Create a new job.
Use the on-screen keypad to enter the drill rod length, then select Enter.
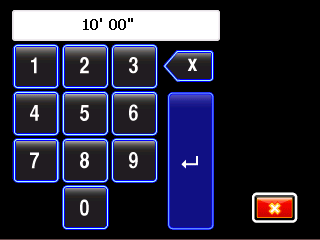
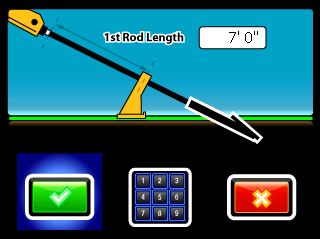
With the drill housing slots half above and half below the ground, measure from the vices to the top of the rod.
If the value on the screen matches the measured value, select OK to set this value and skip to the next step.
If not, select the keypad to enter a new value and then select the green check mark.
If you cannot position the housing as pictured, measure the depth of the drill head from the center of the slots to the ground level. This value (relative elevation at entry) will be used later to modify the uploaded LWD file.
If you have surveyed the difference in elevation between the entry point and exit point, select Survey Point.
Then select the Job # and enter this value using the keypad.
This value (relative elevation at exit) can be edited later either through this menu item or on the uploaded LWD file.
Exit to the Main menu.
Select Locate Mode.
Before You Start
DigiTrak LWD is compatible with both Ares and Falcon locators. The following instructions are for the Falcon F5 locators. For instructions for the Ares locator, go to the article "Log data on an Ares locator."
From the Locate screen, hold the trigger and toggle right.
If you have not yet enabled DataLog, set up a job before continuing.
With the locator positioned within range of the transmitter, record the first data point (rod 0).
The only available option will be Record Pitch Only.
Advance the drill head to the end of the first rod and position the locator over the Locate Line (LL) or the Front Locate Point (FLP).
Hold the trigger and toggle right to view and record data.
- Record depth/pitch
- Record pitch only (ignores depth) *
- Record a blank rod *
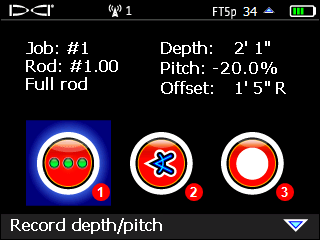
If depth is not correct, select Exit and verify locator is positioned over LL or FLP and repeat this step. If depth is still incorrect, select the pitch only recording option.
Continue drilling, using the trigger/toggle right sequence to record data points at the end of each drilled rod.
To Pause * or Close * a DataLog job, toggle down from the Locate screen and select the desired option.
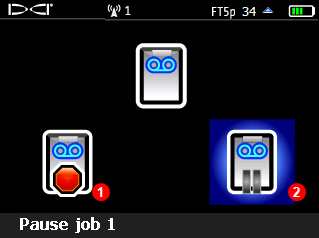
- Close job
- Pause job
Records the pitch value and rod length on the locator. Use it when:
1. The locator cannot be positioned at the LL or FLP
2. If the depth value is incorrect due to the presence of passive interference such as rebar, which can lead to incorrect depth and topography values in the graph.
Use Blank Rod when the locator is not within the range of the transmitter such as during some river and highway crossings. This records the rod length on the locator to maintain the proper bore length for number of rods drilled. It cannot be used for the first or last rods recorded.
Allows you to exit the locate screen and continue to add to the job once you return to locating.
Note: A power cycle will automatically close the job. You can still Append to it later.
Select this option once you are done logging the bore. You can still Append to it later.
At the Locate Mode screen, hold the trigger and toggle right to view Recording Options.
Toggle down and select View/Delete rod data.
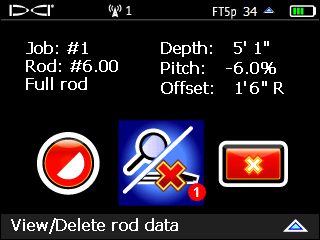
- View/delete rod data (pull back a rod)
The most recent rod (the only one that can be deleted) is highlighted in the top row.
To return to the Locate screen without deleting this rod (data point), toggle left or right.

- Data for most recent rod
Depths in green were recorded at the LL; depths in white were recorded at a locate point (LP).
A blank (---) depth occurs when blank or pitch-only recording options are used.
Recording a rod without pitch (blank rod) will result in a blank relative depth value.
To delete the last rod (required if it was pulled back or accidentally recorded twice), click, then select the check mark, then click again to confirm rod deletion.
Continue these steps for each last rod to delete. Ensure that the number of rods deleted matches the number of rods pulled back. When you are finished, toggle left or right in the table to return to the Locate Mode screen.
From the Bore Log page, tap the bore log you want to edit. The bore log opens in the Details tab.
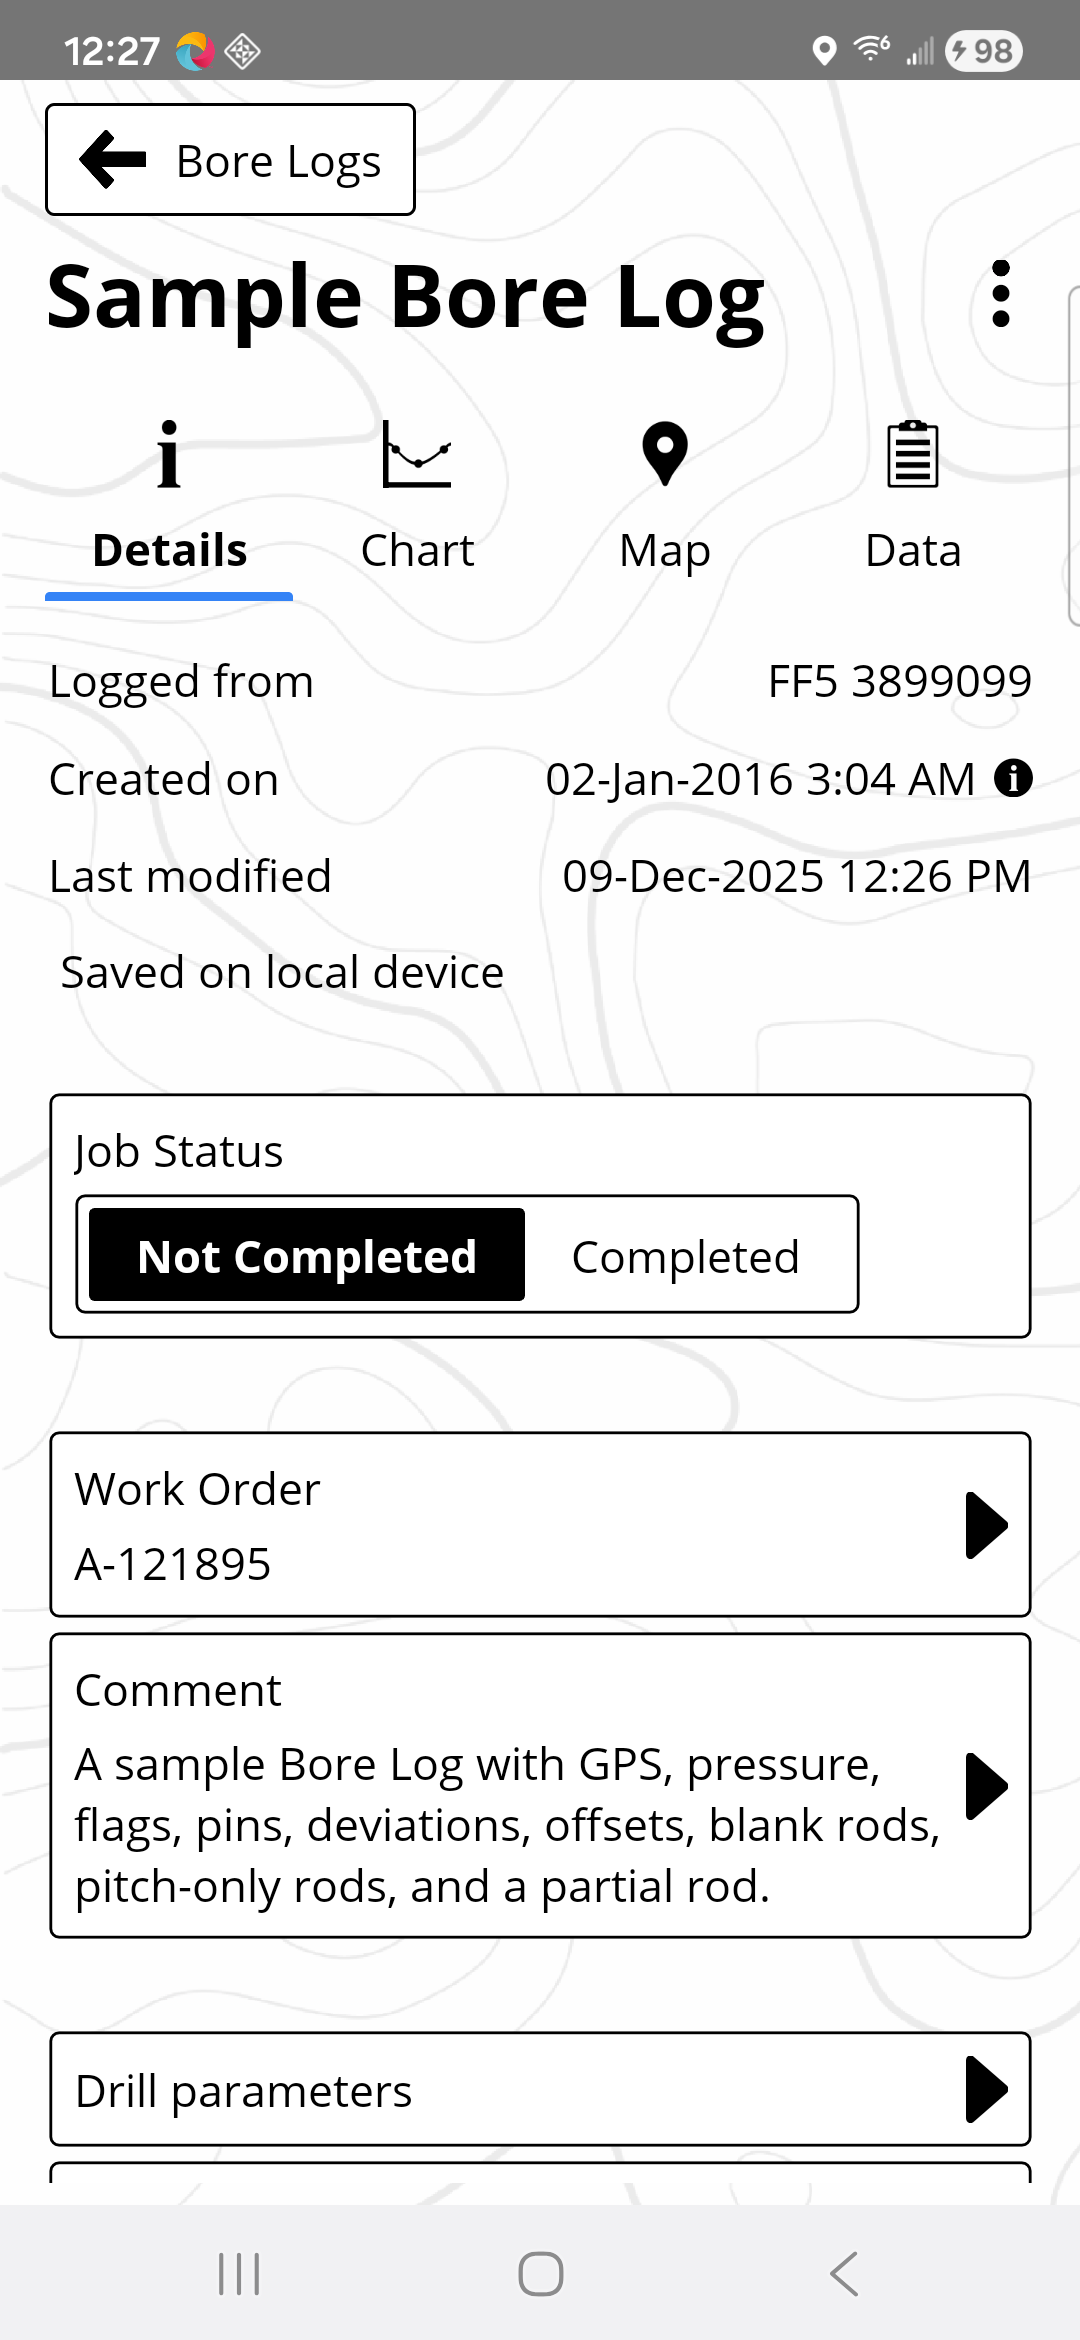
Tap a field to edit the information, and then tap Save.
To change the default information about the contractor performing the job to be included in future reports, go to Settings Information and then Contractor Information.
To provide the most detailed and accurate job report annotations maybe required. Identifying utilities crossed or other annotations such as creek or road crossing add pertinent details to the report.
To use saved customer information, tap Customer Information and then tap Use Saved Information.
You can edit data in LWD to make the charts more presentable to clients. Insert a missing data point, * remove duplicate data or hide an erroneous data point that distorts an otherwise on-track bore plot.
Data recorded by the locator at least once for each rod. There may be more than one data point per rod, such as when logging partial rods.
There are reasons for editing rod data where for example an incorrect depth or pitch was logged due to interference *. All edited rod data is marked as having been changed, so notes can be helpful to explain the reason for the edit.
Your locator can only detect active interference, not passive interference, such as rebar. Lower frequency bands tend to perform better around passive interference. Middle bands can perform better in deeper bores and may have longer Target Steering capability. High bands have slightly less signal strength, but tend to offer better performance around active interference such as power lines.
Before You Start
You can edit or add details about the rod.
Data recorded by the locator that has been edited is marked as having been modified.
To edit or add information to specific rod, select the rod in the Data view by tapping on it. Data that can be edited is indicated by the arrow.
Tap the line containing the data to be edited. The Edit dialog opens.
Edit the data and tap Save.
To restore originally recorded data, use the Revert function.
You can add data to rods, flags and pins. For example, tap + to open the dialog box.
Before You Start
Only inserted rods can be deleted as any original data logged in the field can not.
In the Data view, tap on an inserted rod (designated as -A, -B, etc.) to select it.
Tap Edit.
Tap Delete.
You can insert a rod when a data point *was missed or not recorded in the field.
In Data View, tap on the data point after which you want to insert the data point. In this example this is rod 5.
Tap Edit at the top of the screen.
Choose Insert.
“Rod 5-A” has been added to the Chart and Data views.
Data recorded by the locator at least once for each rod. There may be more than one data point per rod, such as when logging partial rods.
In the Table view, tap the rod you want to hide or remove to select it.
Tap Edit.
Tap Hide or Remove.
Before You Start
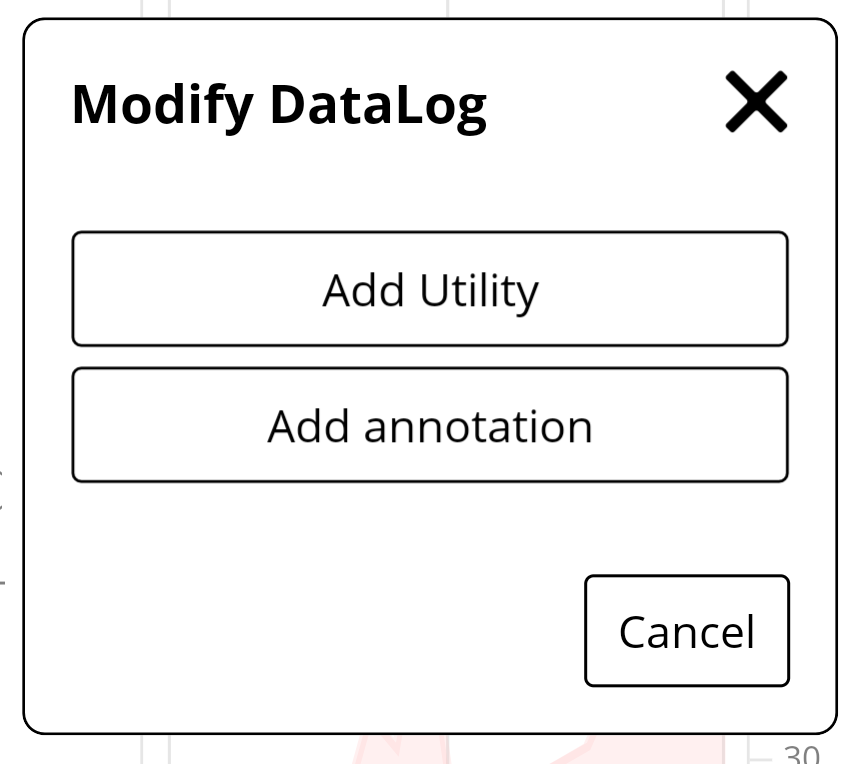
Annotations are used to add details to the chart, such as roadways or creeks for example.
To add an annotation, in the chart view, tap + on the bottom left of the screen.
Tap Add Annotation.
A rectangle with dashed lines is created. Tap on the rectangle and drag it to the desired position
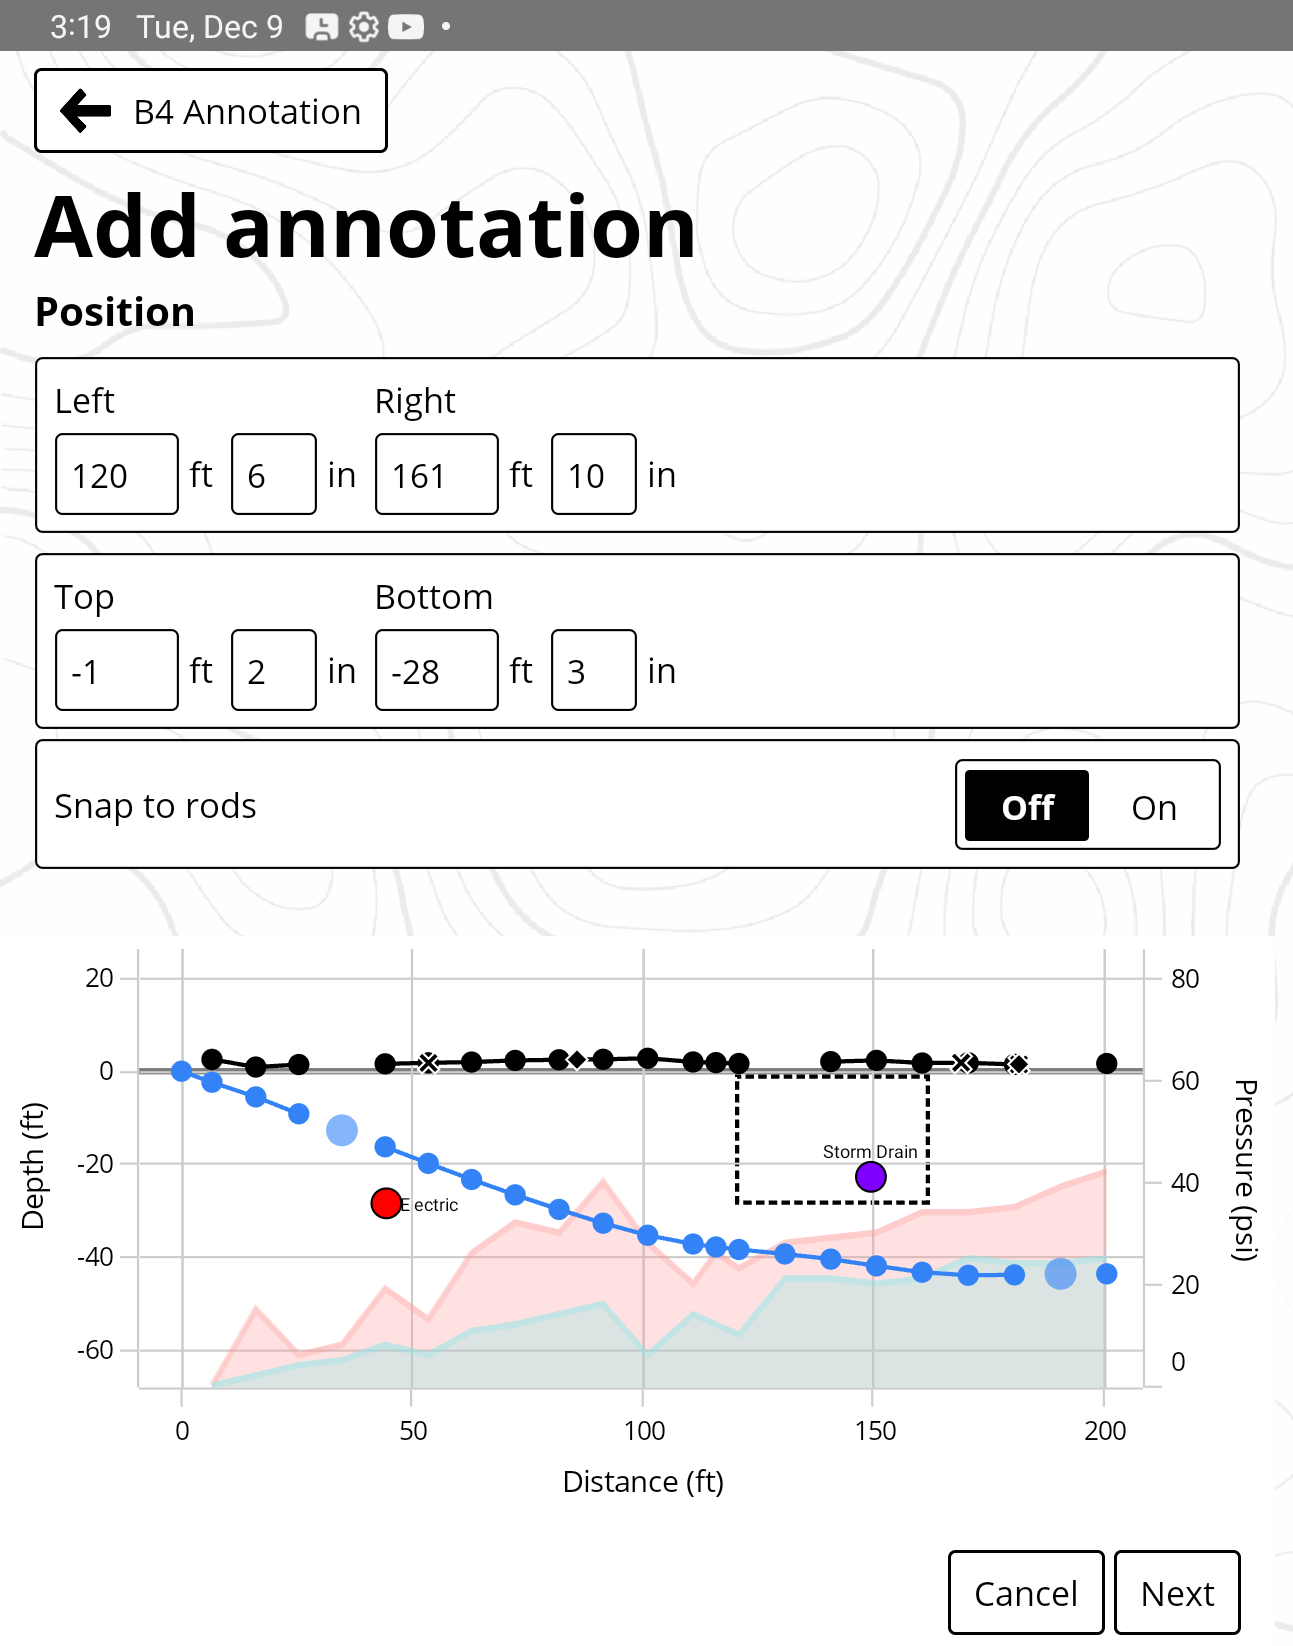
Use the Left/Top/Right/Bottom values to set the final size and location of the Annotation and tap Continue.
Tap Next to select the shape you want to use.
Use Basin to designate rivers or other bodies of water.
To fill in the shape, choose Draw Background and pick a color.
Tap Create.
Siggi's doc
If the bore log is ready for editing, annotating, or presenting, mark the bore log as Complete.
On the bore log Details tab, under Job Status, tap Complete.
If someone attempts to upload the bore log again, a warning is displayed.
From the Bore Log page, tap the bore log you want to edit. The bore log opens in the Details tab.
Tap a field to edit the information, and then tap Save.
To change the default information about the contractor performing the job to be included in future reports, go to Settings Information and then Contractor Information.
To provide the most detailed and accurate job report annotations maybe required. Identifying utilities crossed or other annotations such as creek or road crossing add pertinent details to the report.
To use saved customer information, tap Customer Information and then tap Use Saved Information.
Under Settings in the Export section, tap Contractor Logo.
Tap Select an Image.
Browse and select a .jpg or .jpeg file. The recommended image size is 75 x 30 pixels.
For iOS devices, the image needs to be saved in the Files folder.
Things You Should Know
You can choose how charts are scaled.
- 1:1 This is the default setting.
- Scale to Fit The chart fits the screen.
- Manual Choose the settings to focus on a section or to remove white space in the vertical.
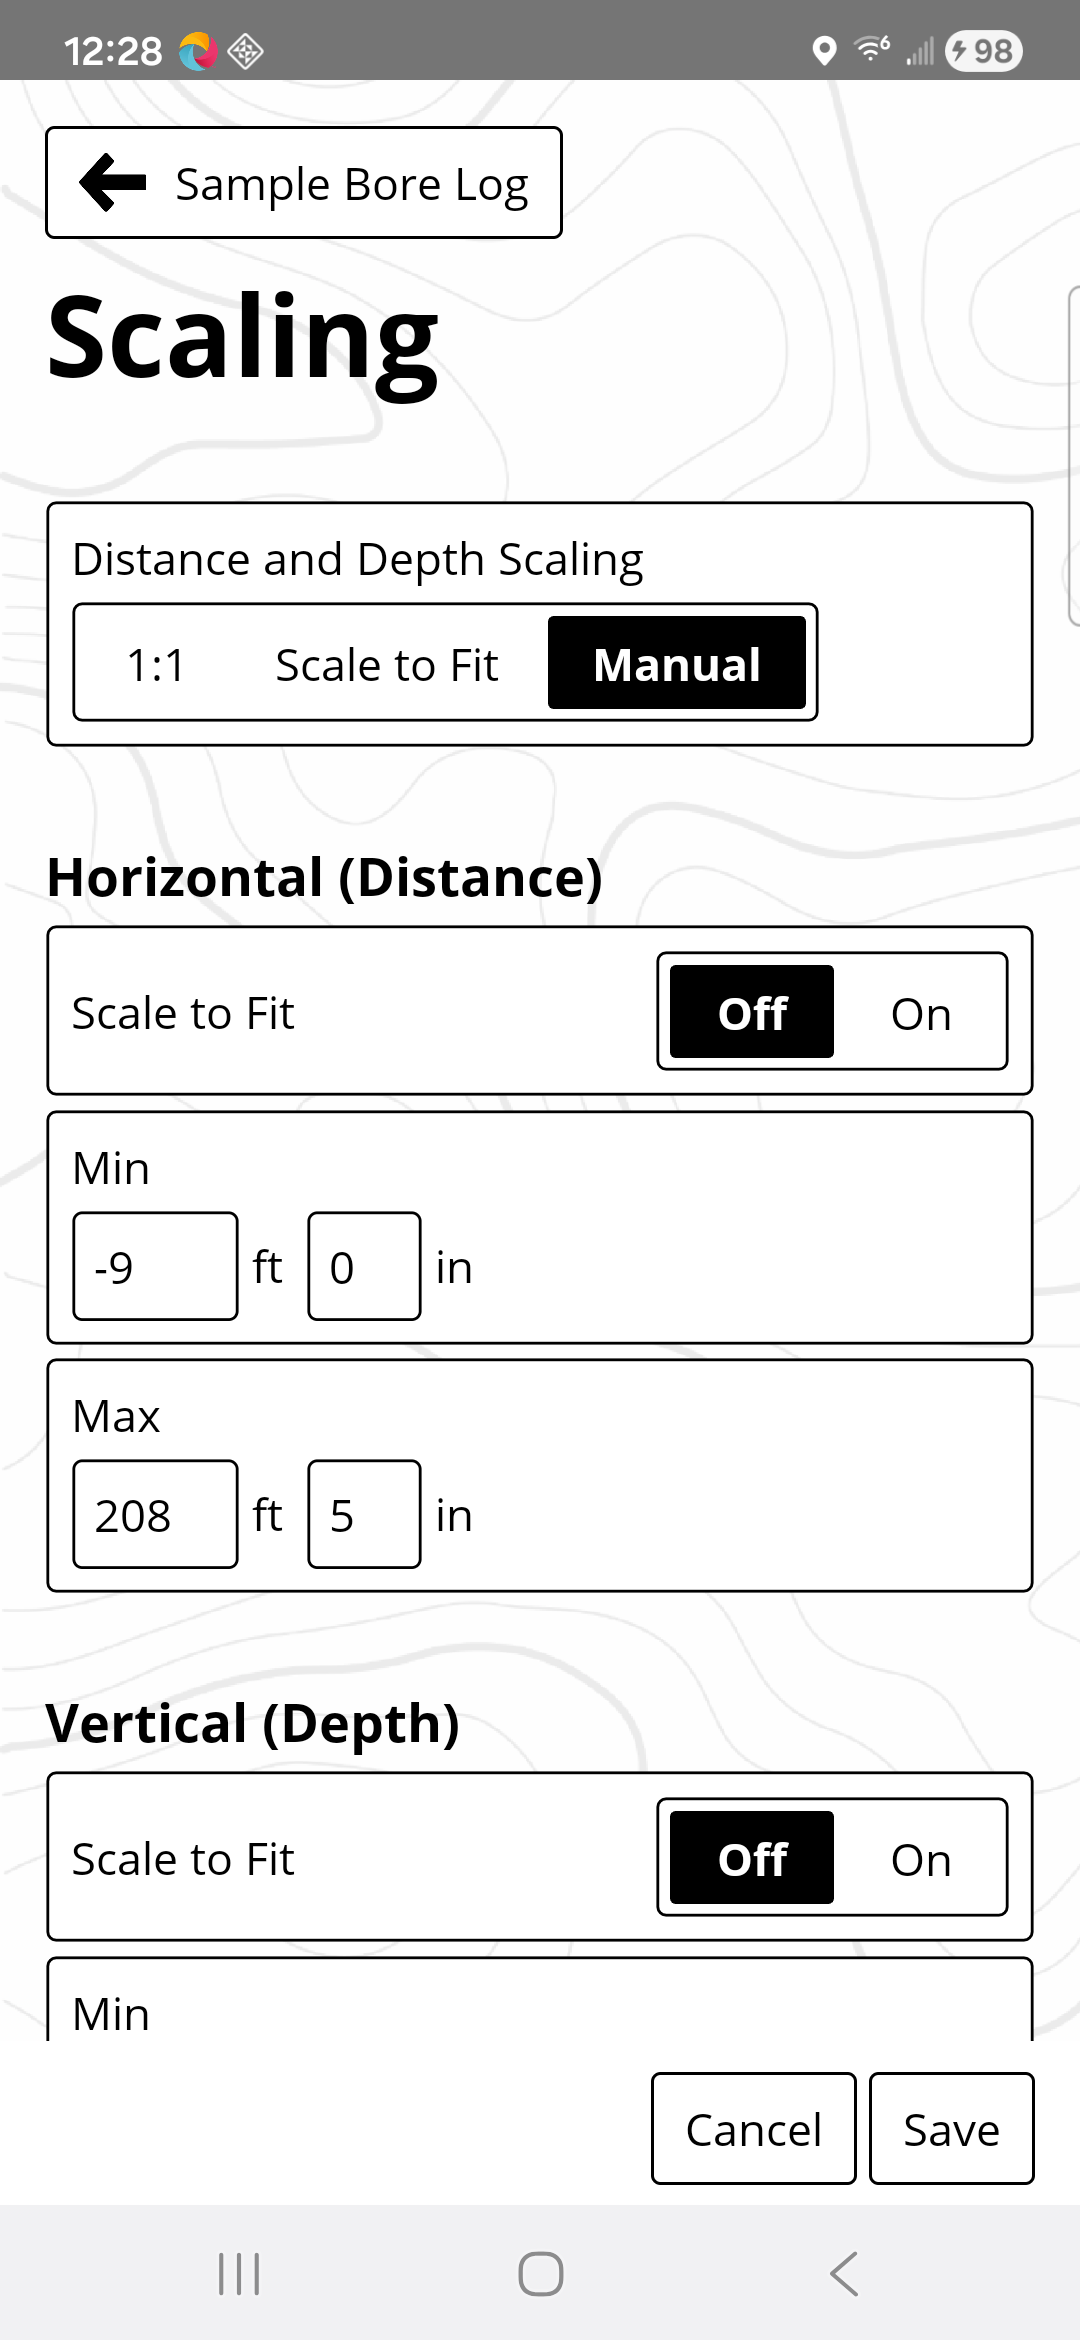
At the bottom right of the chart, tap Scaling.
The default option is 1:1. Tap either Scale to fit or Manual to change scaling.
For manual scaling, enter the Minimum and Maximum values for the axis.
Tap Save.
Tap Scaling at the bottom right of the chart.
Under Vertical (pressure), tap Manual.
Enter the Min and Max pressure values.
Tap Save.
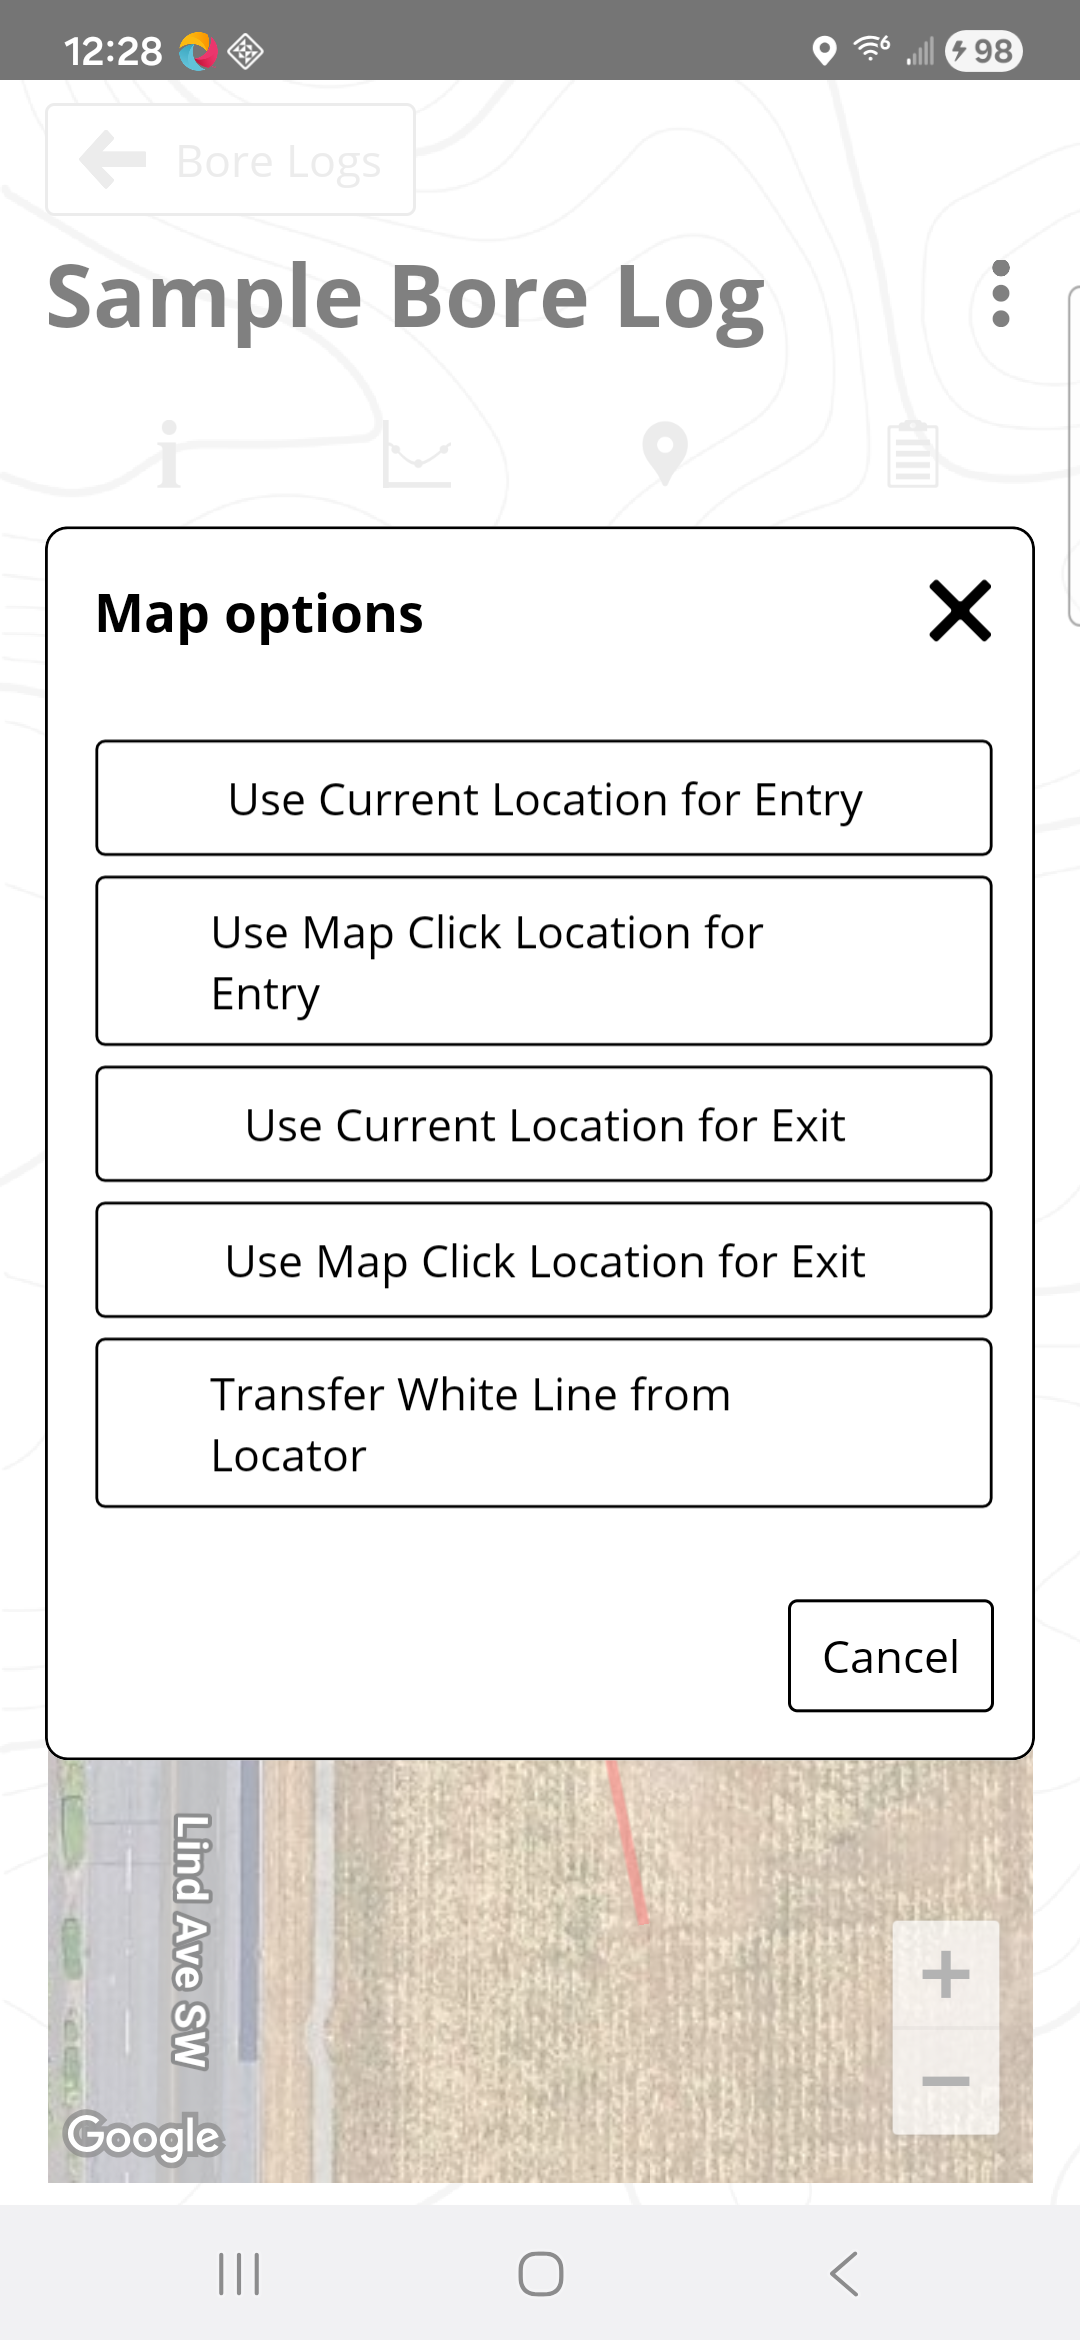
You can control what is shown on the map. Tap the Map tab, and then Info.
Under PDF iGPS output
- To exclude all iGPS data points in the PDF export, tap Hide All.
- To include all iGPS data points in the PDF export, tap Show All.
Under Display
- To exclude iGPS, Current Position, or Whitelines in map view in the LWD App, tap Off.
When using iGPS, each of the logged rods will have a GPS coordinate and that shows up on the map as a pin. Each pin can be hidden by tapping on it.
When no iGPS data is available, entry and exit for the bore can be added using the map. You can control the GPS data displayed on the map in the PDF export and transfer a whiteline job from the locator.
For the bore log in question, tap Map.

To add an entry or exit point, tap Add on the map.
If you are in the field and at either the entry or exit points, you tap “Use Current Location for Entry” or “Exit.” Keep in mind that those are only as accurate as the GPS of the mobile device.
For better accuracy, tap Use Map Location for Entry or Exit on the Map. Zoom in on the map and tap the desired location. You can move the location by tapping again. Once you are satisfied, tap the checkmark to accept.
LWD attempts to automatically sync to the cloud when the user is logged in. When edits are complete and the job is closed, changes are synced so that the latest version of the job is always available on the cloud. Each job has an icon indicating the state of the job as it relates to syncing.
Job is synced. The job on the device and on the cloud is the same.
Sync is pending. The job is being synced.
Unable to sync. There are typically three causes for this state:
- there is no internet connectivity
- the job is from a locator that does not have a myDCI subscription
- there are log-in issues
Unknown Issue. An unknown syncing issue has occurred.
Download. If there is a newer version on the cloud, you can download that version from the cloud.
Tap Details menu.
In the File Type menu, select the type of file to save.
- Drill Data Files
- CSV *
- KML *
- PDF *
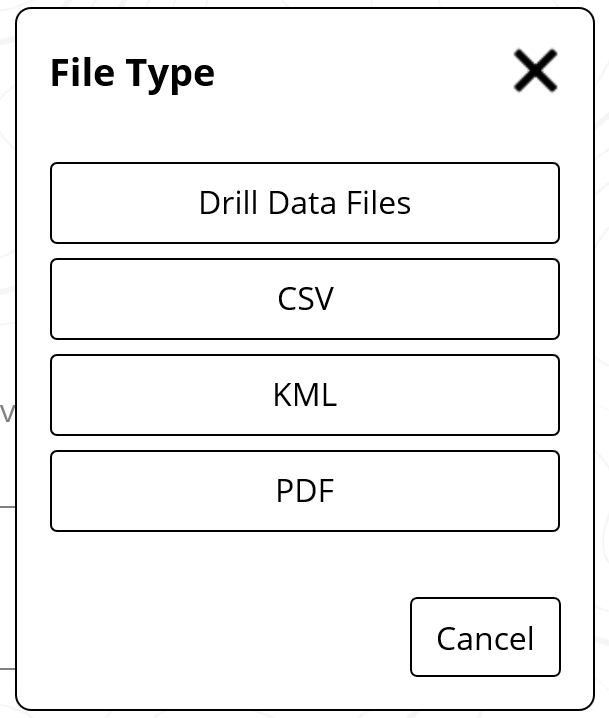
Enter the filename, and tap Save.
"Comma-separated value" is a plain text file that stores data. Each line of the file is a data record with fields separated into columns with commas. The CSV file is used by applications to export and import data.
“Keyhole Markup Language” is the file format to display data overlaid on an online map, such as a bore path on a Google Earth or Apple map.
"Portable Document File" - PDF stands for "portable document format". PDF files cannot be modified.
The list of Bore Logs displays all of the Bore Logs associated with your device.
You can sort and filter the list, including bore logs that are stored on the LWD Cloud for your company (requires a free myDCI portal account).
- To sort the list, tap the Sort by icon in the top right. It displays the current sort method. Tap how you want the list to be sorted: Date created, or Alphabetical.
Last modified,
- The Filter icon displays the number of current filters, to clear the filter, tap the Filter icon, tap Clear filters, and then Apply.
- To filter by storage location, tap the filter icon, tap either Device or Cloud, then Apply. The bore log list is updated.
To access the bore logs in the LWD Cloud requires a myDCI account. Contact your company's myDCI portal account manager for an invitation.
Before You Start
To share a file (PDF *, CSV *, KML *) on a mobile device, the user must be logged into a myDCI portal account.
Logging into a myDCI portal account is not required on Windows.
Tap Share.
You can either format your file using the defaults defined in Settings or change the options:
- Page size
- Detailed Report or Summary Report
- Map coordinates
- Include comments
- Include pressure data
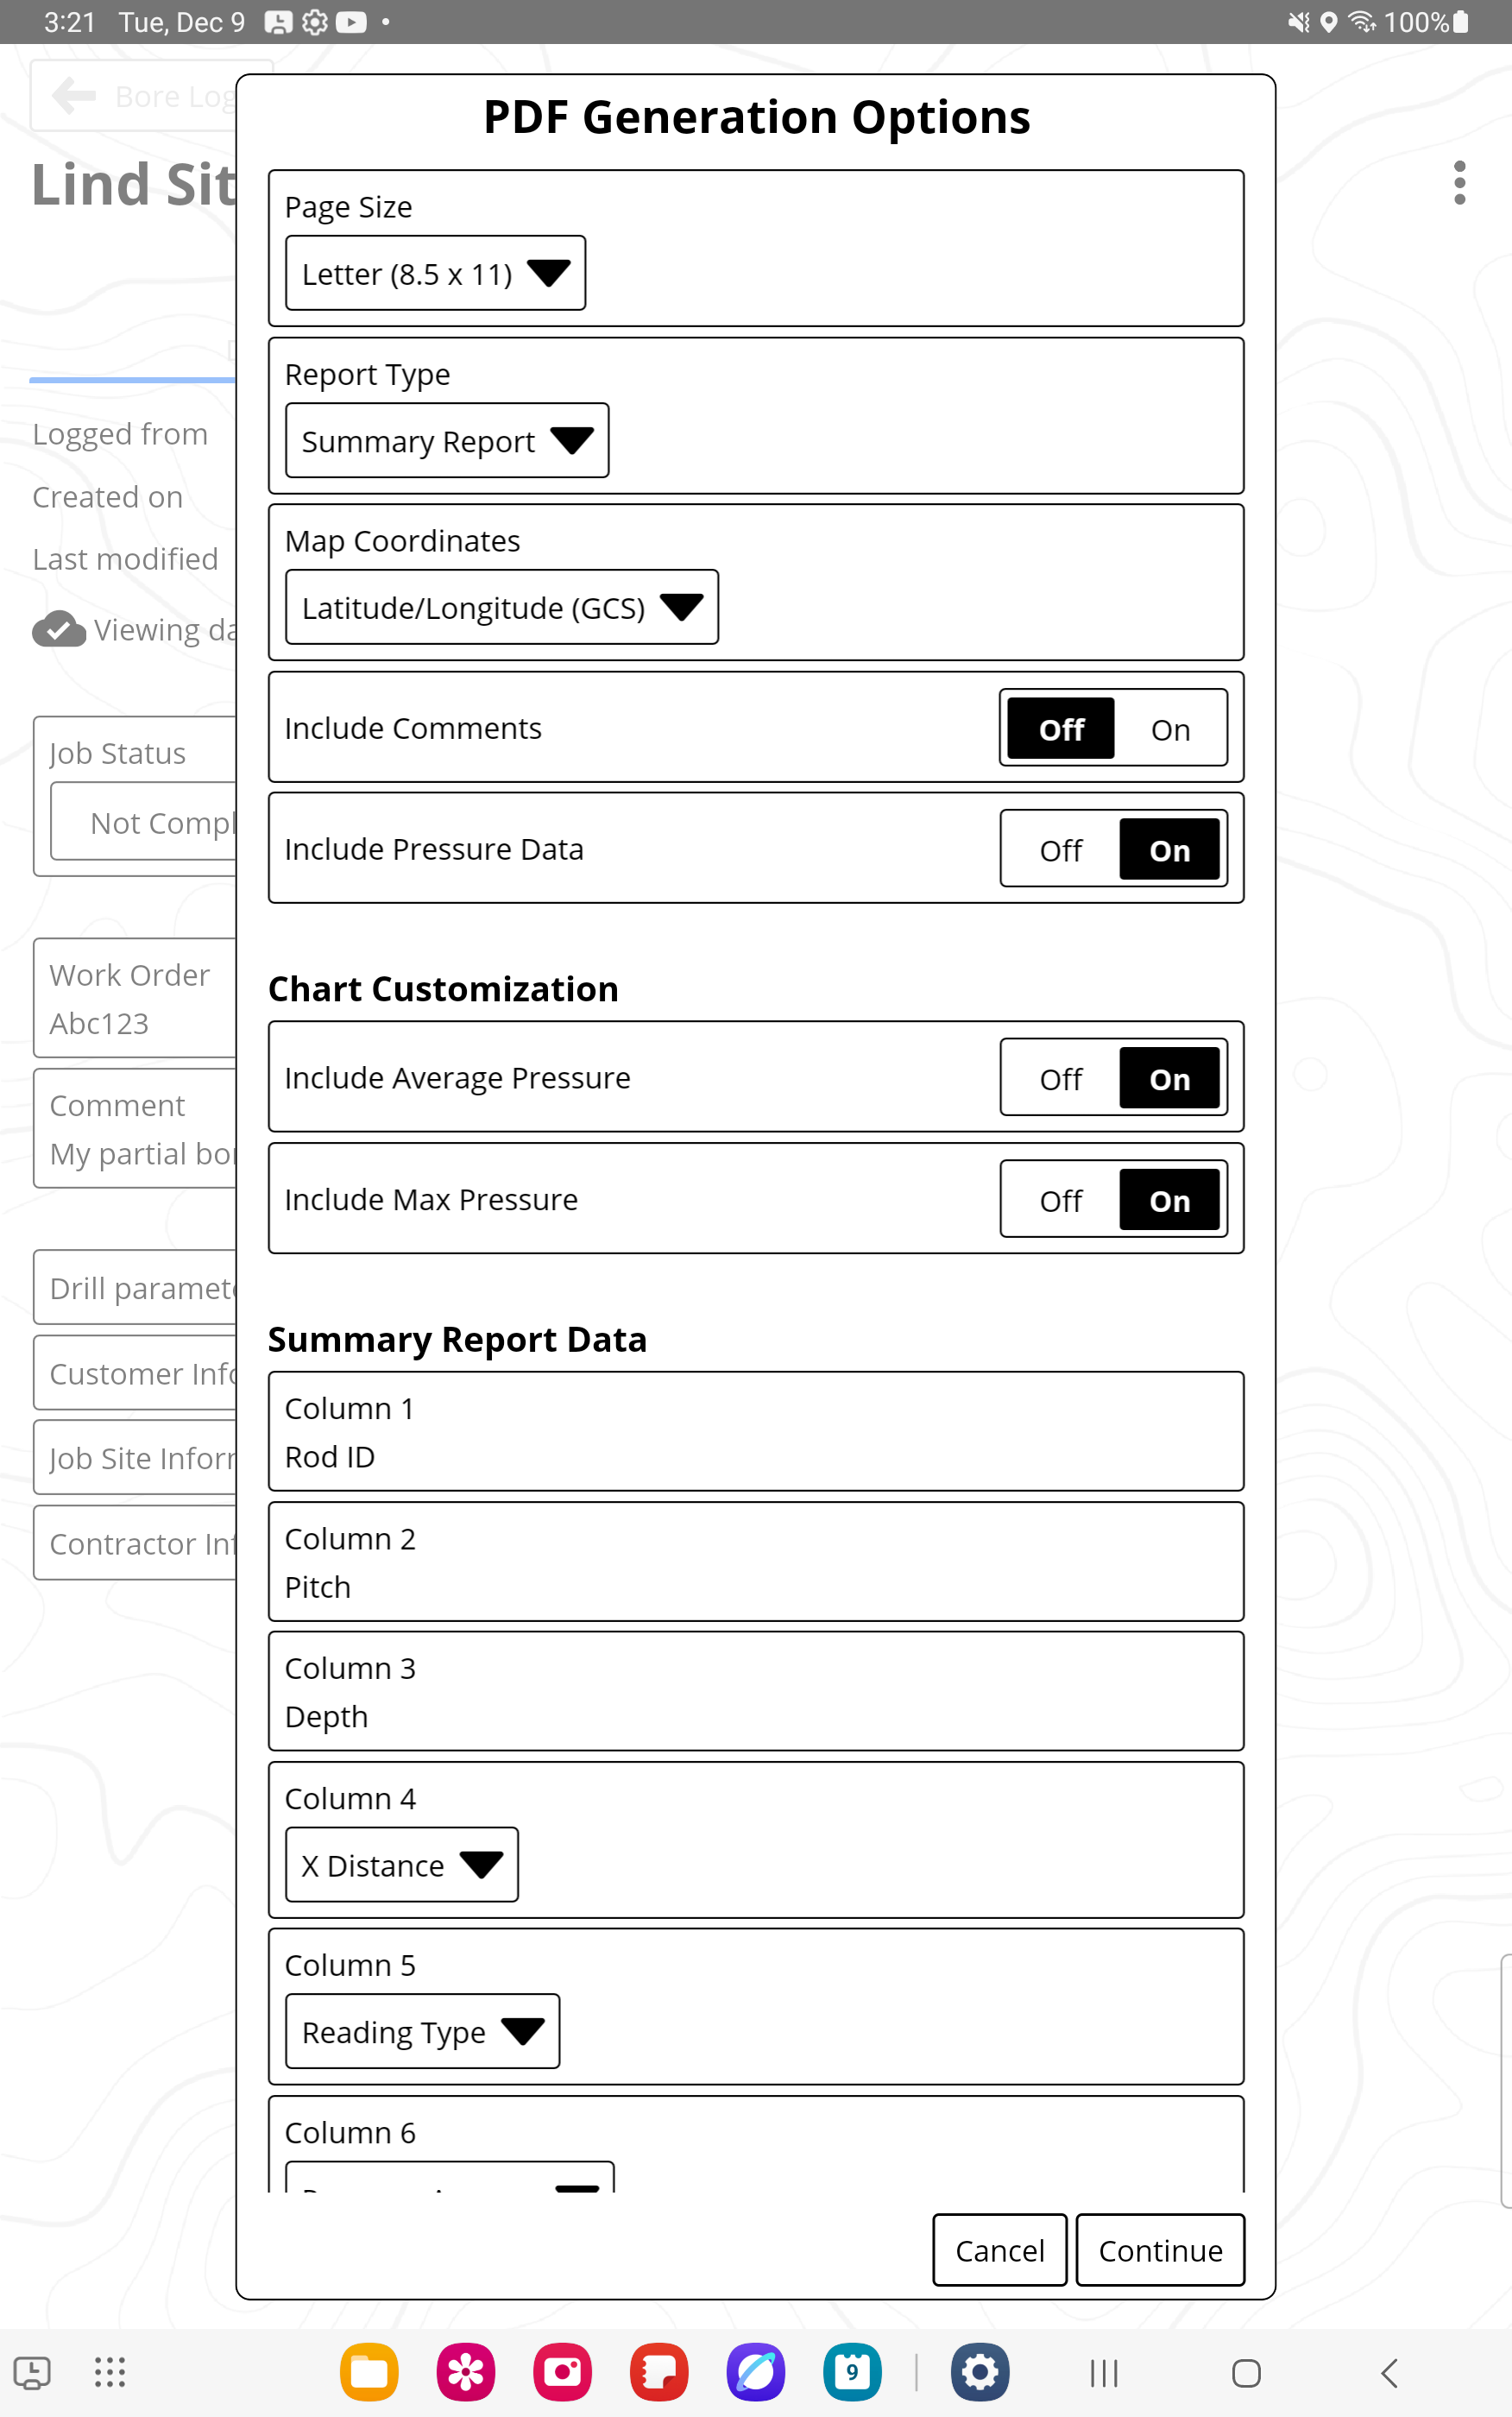
.
Tap Continue to create the file to be viewed.
Tap Email.
Complete the email and send.
"Portable Document File" - PDF stands for "portable document format". PDF files cannot be modified.
"Comma-separated value" is a plain text file that stores data. Each line of the file is a data record with fields separated into columns with commas. The CSV file is used by applications to export and import data.
“Keyhole Markup Language” is the file format to display data overlaid on an online map, such as a bore path on a Google Earth or Apple map.
Contact
DCI USA
19625 62nd Ave S, Suite B103
Kent, WA USA 98032
DCI@digital-control.com
1.800.288.3610
1.425.251.0559
DCI Australia
2/9 Frinton Street Southport
Queensland 4215 Australia
DCI.Australia@digital-control.com
+61.7.5531.4283
+61.7.5531.2617
DCI China
368 Xingle Road Huacao Town
Minhang District Shanghai 201107, P.R.C
DCI.China@digital-control.com
+86.400.100.8708
+86.21.6432.5186
DCI Europe
Brueckenstraße 2
97828 Marktheidenfeld Germany
DCI.Europe@digital-control.com
+49.9391.810.6100
+49.9391.810.6109
DCI India
Unit No. 1022, 10th Floor DLF Tower B Jasola District Center
New Delhi 110025 India
DCI.India@digital-control.com
+91.11.4507.0444
+91.11.4507.0440
DCI Philippines
404-405 Energy Opt. Bldg Prime St, Madrigal Business Park 2
Alabang Muntinlupa City, Philippines 1780
DCI.Philippines@digital-control.com
(02)79802647
+632-79802647