
| % slope | Depth increase inches (cm) | % slope | Depth increase inches (cm) |
|---|---|---|---|
| 1 | 0.6 (1.5) | 14 | 8.4 (21.3) |
| 2 | 1.2 (3.0) | 15 | 9.0 (22.9) |
| 3 | 1.8 (4.6) | 16 | 9.6 (24.4) |
| 4 | 2.4 (6.1) | 17 | 10.2 (25.9) |
| 5 | 3.0 (7.6) | 18 | 10.8 (27.4) |
| 6 | 3.6 (9.1) | 19 | 11.4 (29.0) |
| 7 | 4.2 (10.7) | 20 | 12.0 (30.5) |
| 8 | 4.8 (12.2) | 21 | 12.6 (32.0) |
| 9 | 5.4 (13.7) | 22 | 13.2 (33.5) |
| 10 | 6.0 (15.2) | 23 | 13.8 (35.1) |
| 11 | 6.6 (16.8) | 24 | 14.4 (36.6) |
| 12 | 7.2 (18.3) | 25 | 15.0 (38.1) |
| 13 | 7.8 (19.8) | 26 | 15.6 (39.6) |
DCI DigiGuide User Manual
2026.10.29- Only operate your DCI guidance system in accordance with the operating instructions for your system.
- Serious injury and death, as well as property damage, can result if underground drilling equipment strikes a natural gas line, high-voltage electrical cable, or other utility.
- Work slowdowns and cost overruns can occur if you do not use your system correctly.
- Properly calibrate your DCI guidance system anytime you change frequencies, transmitters, or drill heads and validate the calibration before every drilling project. If you fail to do so, depth readings will likely be inaccurate.
- Interference can lead to inaccurate depth readings and/or interruption of data. See "Special Notes About Interference" for more details.
- DCI guidance systems are used to locate and guide the transmitter (housing) underground. They cannot be used to locate underground utilities.
- Failure to find the front and rear locate points can lead to inaccuracies which may result in drilling off-path and striking an underground utility.
- The locate line on a DCI locator does not indicate the position of the drill head. DCI locators track the transmitter in its housing, which sits behind the drill bit. Also, when drilling steep and/or deep, the locate line may indicate a position behind or ahead of the transmitter. Please see the article "Steep and Deep" for important information on accurately locating the drill head when drilling steep and/or deep holes.
- Ensure that all underground utilities have been located, exposed, and/or accurately marked prior to drilling. Follow all proper safety precautions, such as potholing.
- DCI equipment is not explosion-proof and should never be used near flammable or explosive substances.
- Wear jobsite protective/safety clothing such as dielectric boots, gloves, hard hat, high-visibility vest, and safety glasses.
- Install transmitters into the drill housing as soon as possible after powering on. If you can't, unscrew the cap to power off the transmitter until you can install the transmitter into the drill housing to reduce RF exposure.
- Comply with federal, state, and local governmental regulations (such as OSHA) and all other customary or required safety precautions.
If you have any questions about the operation of your guidance system, please contact DCI Customer Service for assistance.
While DCI guidance systems provide you with technology to combat active interference (and passive interference, with the Sub-K Rebar transmitter), no guidance system is immune to all interference.
Interference can lead to inaccurate depth readings and/or interruption or loss of data. Never rely on data that does not display quickly and/or remain stable.
The Falcon frequency optimizer selects frequencies based on measured interference at a specific time and location.
Interference levels change with time and with even minor changes in location. The frequency optimizer is not a substitute for prudent operator judgment. If performance drops while drilling, consider switching to the other selected band (not available on the Falcon F1) or use Max Mode.
An A icon on the Falcon's locating screen or a warning icon on the ARES screen can indicate signal Attenuation * due to the presence of excessive interference, which can make depth readings inaccurate. Attenuation is normal in shallow depths less than 8 ft (2.4 m). If the signal strength is also flashing, this indicates extreme interference. Depth and locate points may be compromised, and the locator will not calibrate.
Interference is classified as either active (generating electromagnetic signals) or passive (material that can conduct or block electromagnetic signals). Sources of interference may include:
Active
- Traffic signal loops
- Buried dog fences
- Cathodic protection
- Radio communications
- Security systems
- Microwave towers
- Power, phone, fiber-trace, and cable TV lines
Passive
- Metal pipes
- Rebar
- Trench plates
- Chain-link fences
- Vehicles
- Saltwater/salt domes
- Conductive earth, such as iron ore
If you have any questions about the operation of your guidance system, please contact DCI Customer Service for assistance.
The locator automatically attenuates the transmitter signal when locating at shallow depths to reduce excessive signal strength. Attenuation is in effect whenever an "A" appears on the Falcon Locate screen or the attenuation warning icon on the ARES locate mode screen. Attenuation can also indicate the presence of excessive interference, which can make depth readings inaccurate.
Attenuation is normal when the locator is close to the transmitter; attenuation during calibration is a warning to relocate to and calibrate in an area with less interference. The locator will not calibrate when the signal strength is flashing, which indicates the presence of extreme interference.
System working altitude: up to 6,562 ft (2,000 m).
Storage and transportation temperature for locators: -4° to 140°F (-20° to 60°C)
Operating temperature for remote displays: -4° to 140°F (-20° to 60°C)
Operation may be compromised if the equipment is subjected to conditions outside these specified limits.
Ship in original carrying case or packaging of sufficient durability to prevent mechanical shock to equipment during transportation.
If you have any questions about the operation of your guidance system, please contact DCI Customer Service for assistance.
Remove the batteries from all system components during shipping and prolonged storage. Failure to do so may result in battery leakage, which may lead to risk of explosion, health risks, and/or damage.
Lithium-ion batteries must be packaged and shipped by trained and certified personnel only. Never ship damaged batteries.
If you have any questions about the operation of your guidance system, please contact DCI Customer Service for assistance. Connect to DCI Customer Service with the Contact link in the DigiGuide App or find a list of offices in the back of any printed DigiGuide manual and on the DCI website: digital-control.com.
If you plan to store the battery packs for any period of time, please follow these guidelines:
- Store and transport batteries using a suitable protective case that will keep batteries safely isolated from one another. Failure to do so may result in short circuits, which may lead to hazardous conditions, including fire.
- Do not store the battery pack at temperatures greater than 113°F (45°C).
- Do not store the battery pack in a fully discharged state.
- Do not store the battery pack in the battery charger.
- Do not store multiple batteries together where their terminals or other loose conductive materials may contact one another and cause a short circuit.
- Never ship damaged batteries.
- If a lithium-ion battery pack will be stored for an extended period of time, pre-charge the battery to a charge level of 30% to 50% (two or three LEDs illuminated on the meter).
- Do not store the battery pack for more than one year unless it is periodically recharged to the 30% to 50% level.
Lithium batteries are regulated by UN3480 and UN3481 (lithium-ion batteries).
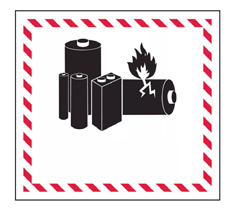
Lithium batteries are considered Class 9 Miscellaneous Dangerous Goods under International Air Transportation Association (IATA) regulations; IATA regulation and Ground Transportation regulations 49 CFR 172 and 174 apply. These batteries must be packaged and shipped by trained and certified personnel only. Never ship damaged batteries.
This symbol on equipment indicates that the equipment must not be disposed of with your other household waste.

Instead, it is your responsibility to dispose of such equipment at a designated collection point for the recycling of batteries or electrical and electronic equipment. If the equipment contains a banned substance, the label will show the pollutant (Cd = Cadmium; Hg = Mercury; Pb = Lead) near this symbol.
Before recycling, ensure batteries are discharged or the terminals are covered with adhesive tape to prevent shorting.
The separate collection and recycling of your waste equipment at the time of disposal will help conserve natural resources and ensure it is recycled in a manner that protects human health and the environment.
For more information about where you can drop off your waste equipment for recycling, please contact your local city office, your household waste disposal service, or the shop where you purchased the equipment.
U.S.: Contact The Battery Network’s drop-off locator at 1-877-2-RECYCLE or visit:
www.batterynetwork.org
The following section is required to remain in French for compliance purposes and not translated.
Ce symbole figurant sur l'équipement indique qu'il ne faut pas le jeter avec les ordures ménagères.
Il vous incombe en effet d'éliminer ce type d'équipement en l'amenant à un site de récupération désigné pour le recyclage des batteries/piles ou d'appareils électriques et électroniques. Si le matériel contient une substance interdite, l'étiquette indiquera le polluant (Cd = cadmium ; Hg = mercure ; Pb = plomb) à côté de ce symbole. Avant de recycler les batteries, assurez-vous qu'elles sont déchargées ou que les bornes sont recouvertes d'un ruban adhésif pour éviter les courts-circuits. La collecte séparée et le recyclage de votre matériel usagé au moment de l'élimination permettront de conserver les ressources naturelles et de veiller à un recyclage en bonne et due forme, qui protège la santé humaine et l'environnement. Pour plus d'informations sur les sites où vous pouvez déposer votre matériel usagé à recycler, veuillez contacter les autorités municipales, votre service d'élimination des déchets ménagers ou le lieu d'achat du matériel.
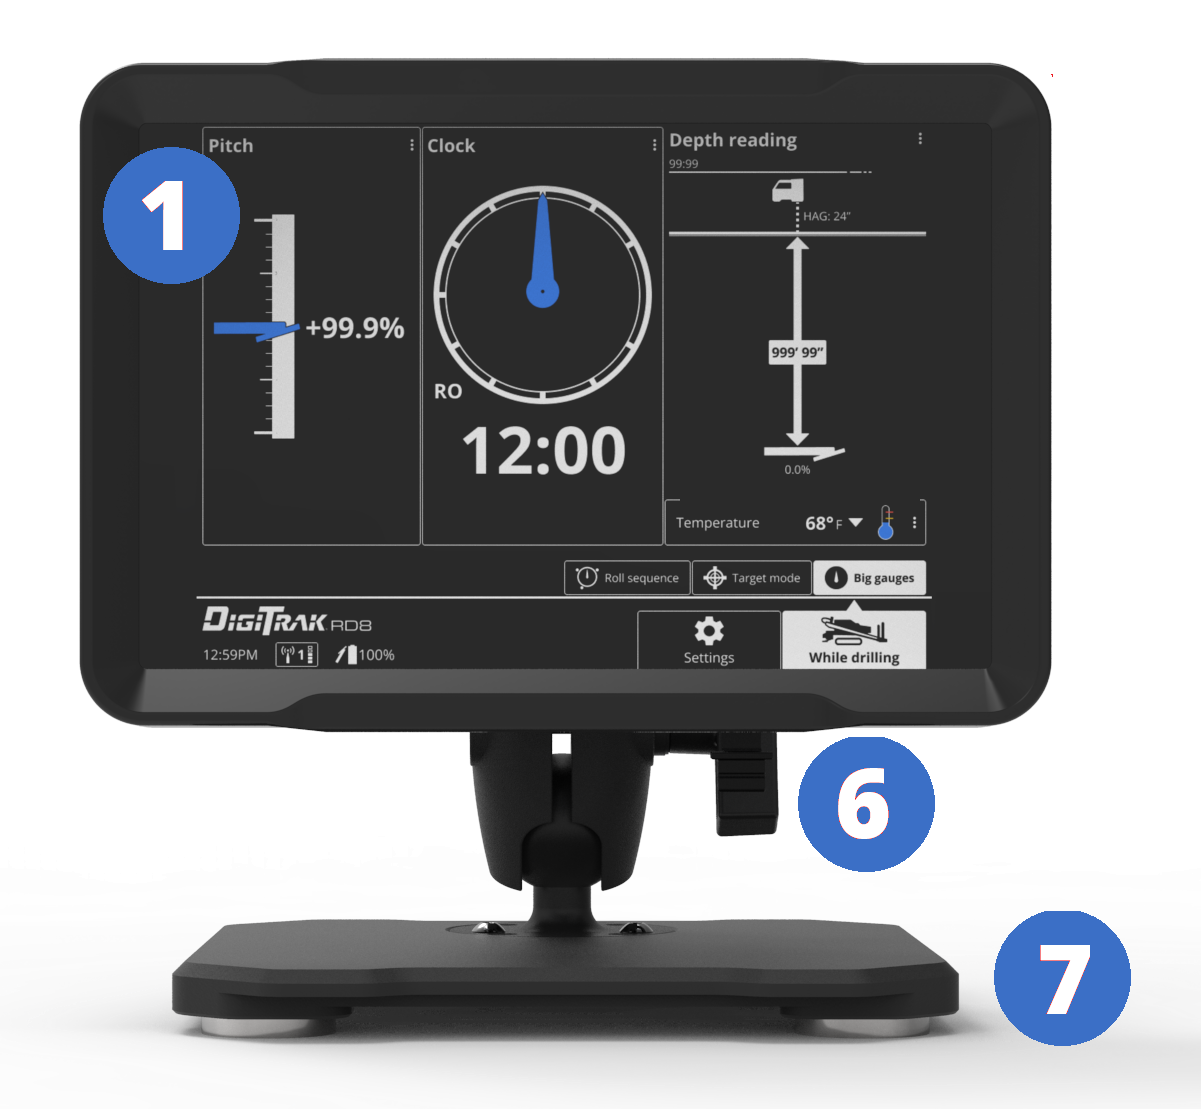
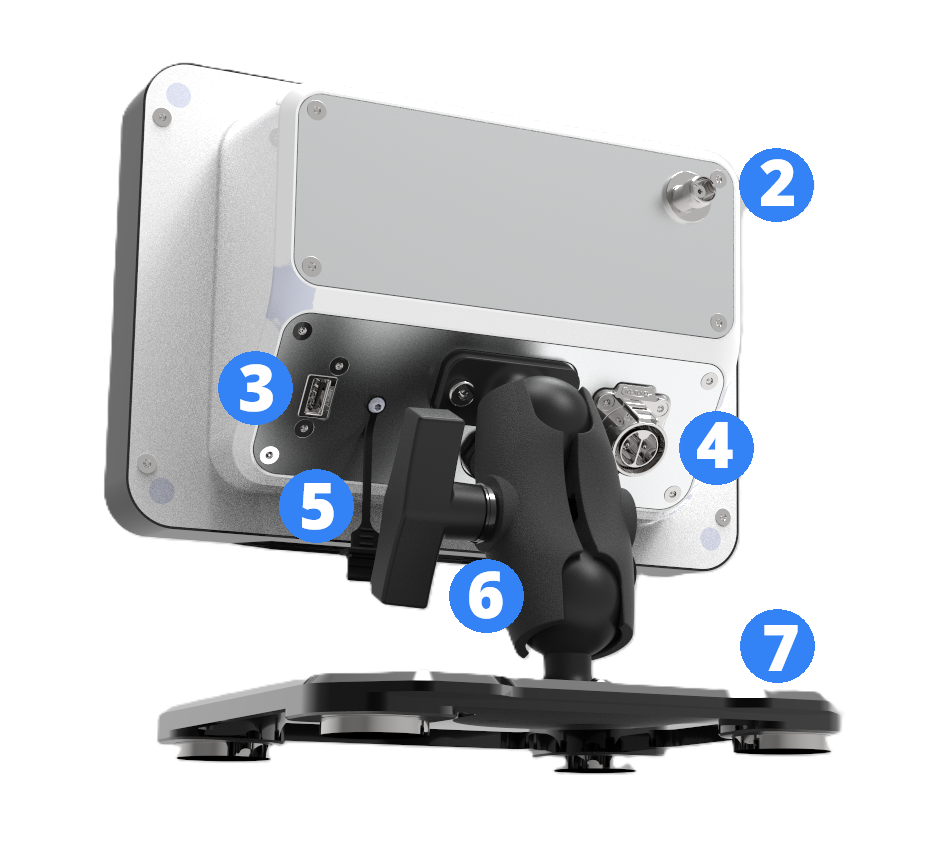
- Touchscreen
- External antenna connection
- USB port
- Power connector
- Cover lanyard
- RAM ball mount and arm
- Magnetic base
When powered on, the RD8 automatically displays the Big gauges screen.
The RD8 has a touchscreen that you can use to navigate the system, controls, and select options. Use the soft pad of your fingertip to tap the display or use gloves with a touchscreen-compatible fingertip. Never use a fingernail or a foreign object.
The RD8 touchscreen has a menu bar and status bar at the bottom of the screen.

The menu bar displays the available screens: Settings and While drilling.
When a screen is selected, the feature tabs are displayed above it. For example, on the While drilling screen, Roll sequence, Target mode, and While drilling.
The status bar displays the time, telemetry channel, signal strength, and transmitter battery life.
To change the telemetry channel, tap the telemetry icon or tap Settings.
To change the language, time, measurement units, and to set warnings and limits, tap Settings.
When the RD8 is turned on, the first screen displays the three main gauges for drilling: Pitch, 24-position clock, and Depth reading.
The bottom of the screen displays the status bar and menu.
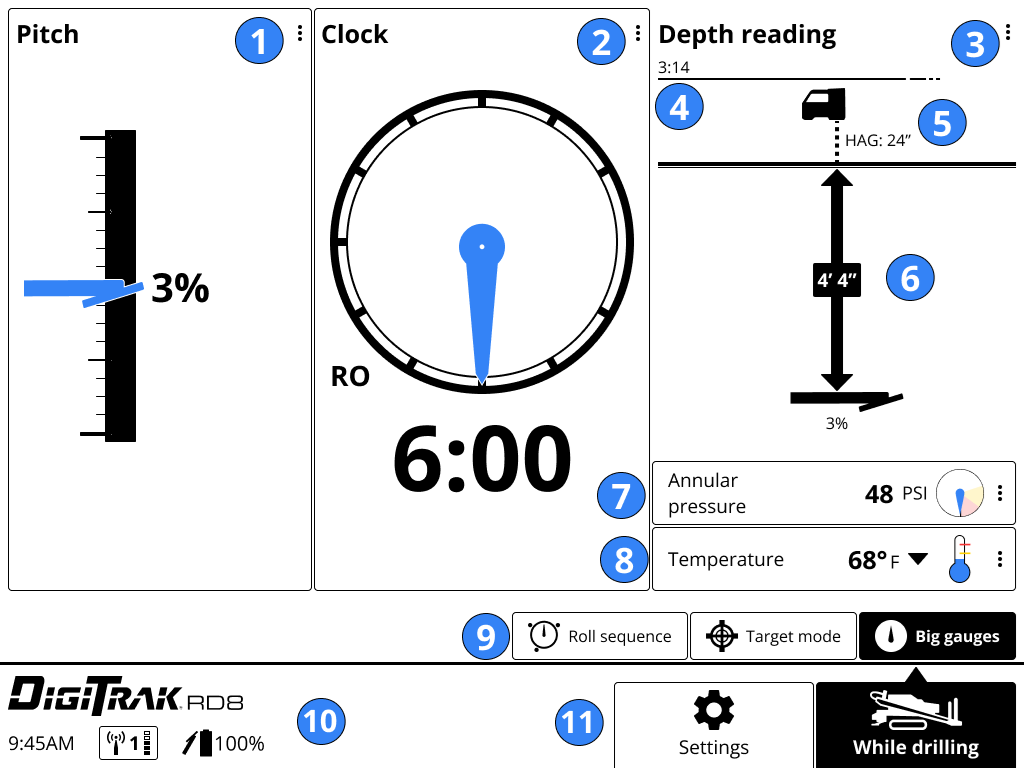
- Pitch pane with gauge
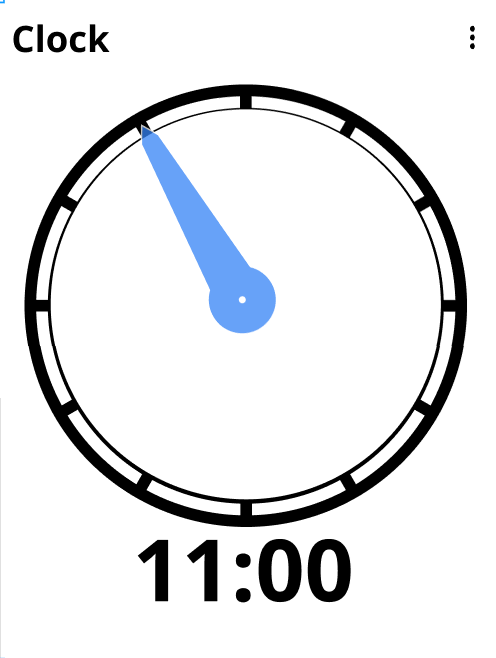
- Clock panel with 24-position clock (roll offset displayed)
- Depth reading pane
- Timer from last depth reading
- HAG™ (Height Above Ground)
- Depth/Estimated projected depth reading sent from locator
- Transmitter annular pressure (for some transmitter models)
- Transmitter temperature
- While Drilling screens (Big gauges selected)
- Status with transmitter telemetry, signal strength, and locator battery life
- Menu buttons (While drilling selected)
Pitch pane details
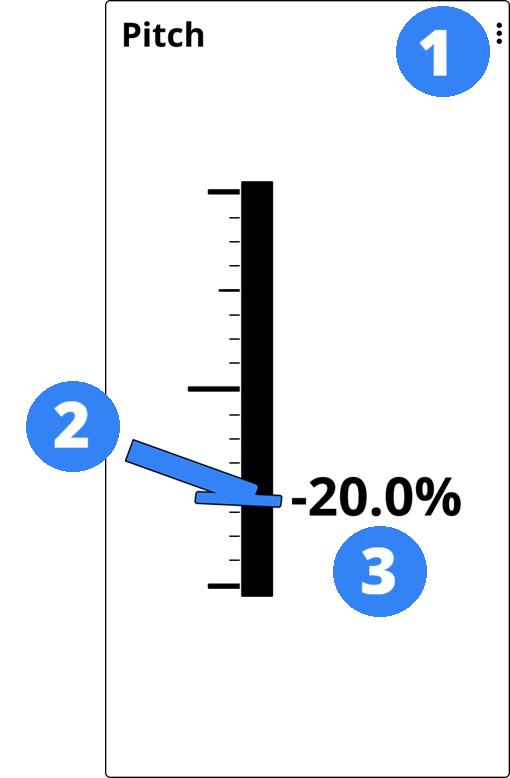
- More options menu
- Drill head position
- Pitch value at the time of depth reading
24-position clock pane
Depth reading pane
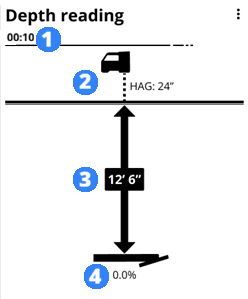
- 5-minute timer from last depth reading
- Locator with Height-Above-Ground *(set on locator)
- Depth reading at time of reading
- Transmitter in drill head and pitch at time of reading.
Status and menu bar
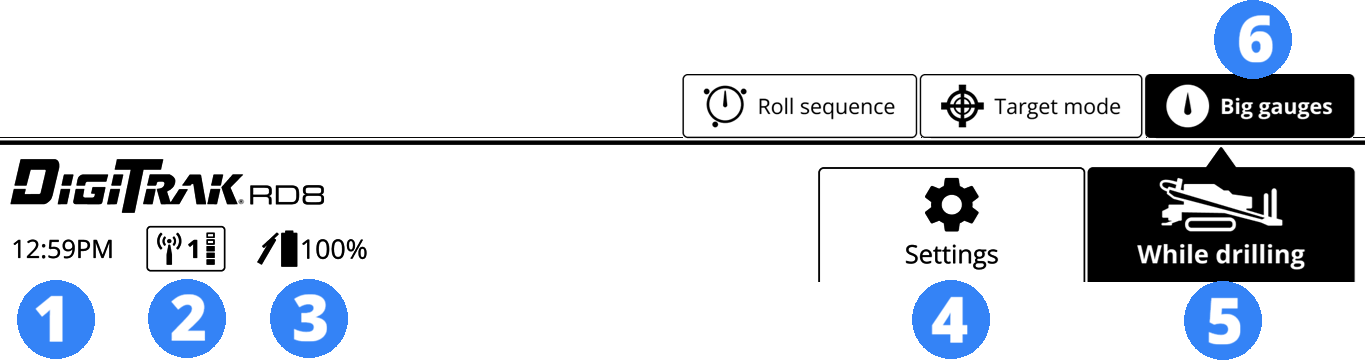
- Time
- Telemetry channel and strength
- Transmitter battery charge
- Settings button
- Menu buttons (While drilling selected)
- While drilling feature tabs (Big gauges selected)
The height you intend to hold the locator above the ground while taking depth readings. HAG is measured from the bottom of the locator to the ground. If you are using a Trakstand with fully extended legs, the HAG is 1' 6" (0.46m).
When Target mode is enabled on the locator, tap the Target mode tab in While drilling to change the display.
For more information on Target mode, see the DCI DigiGuide manual for your locator.

Falcon users. Target Steering is called "Target mode" in ARES.
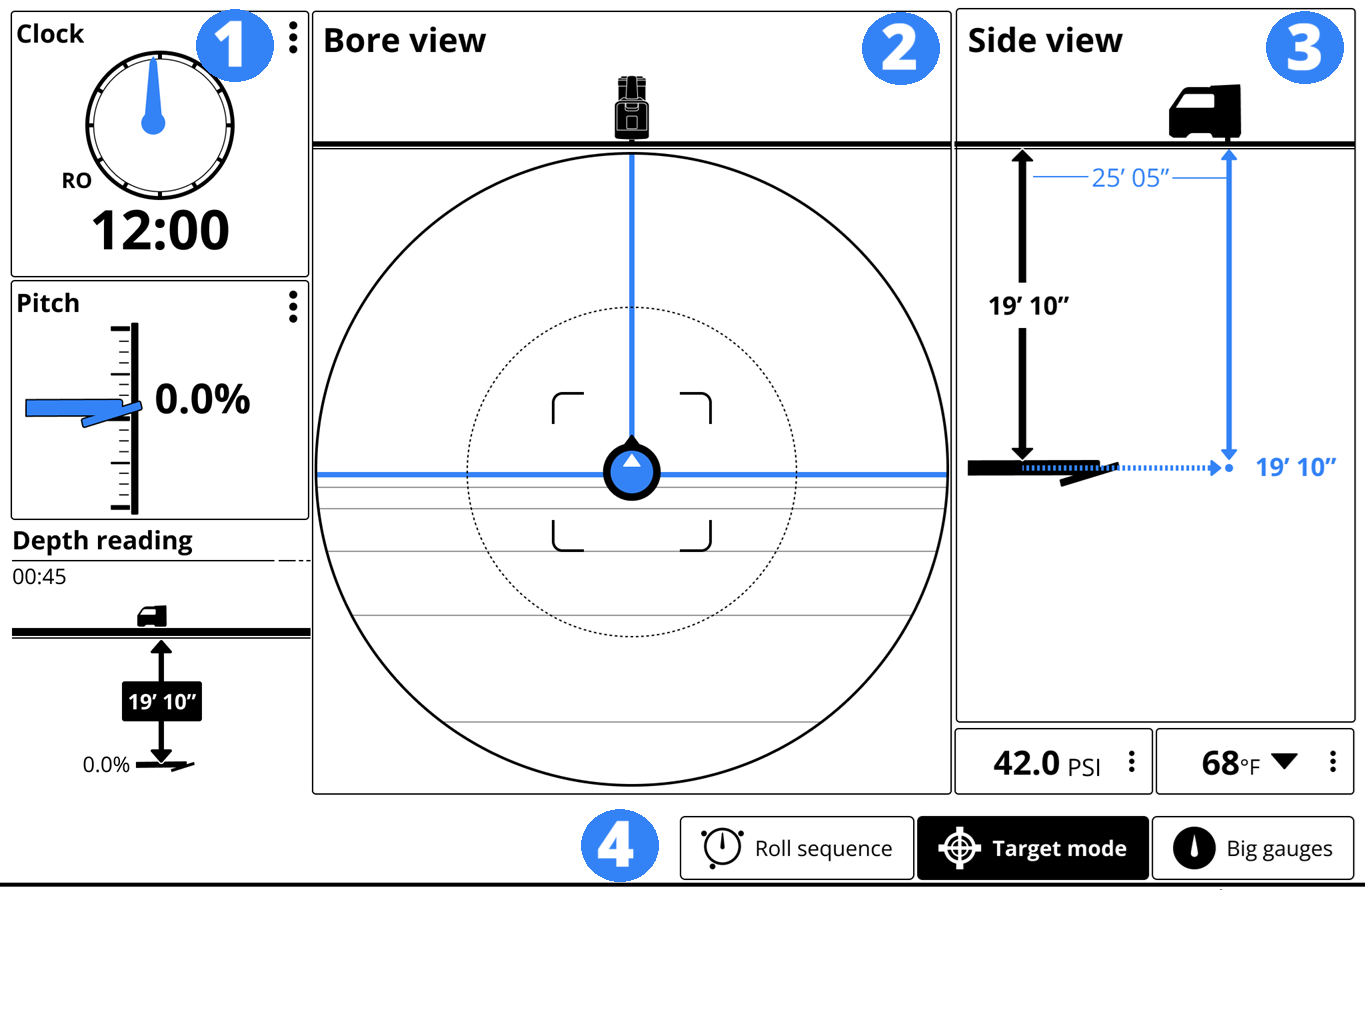
- Small gauges pane (clock, pitch, depth reading)
- Top down bore view pane with transmitter on target (blue ball with blue lines)
- Side view pane
- Status and menu bar (While drilling and Target mode selected)
Bore view (transmitter off target from drill)
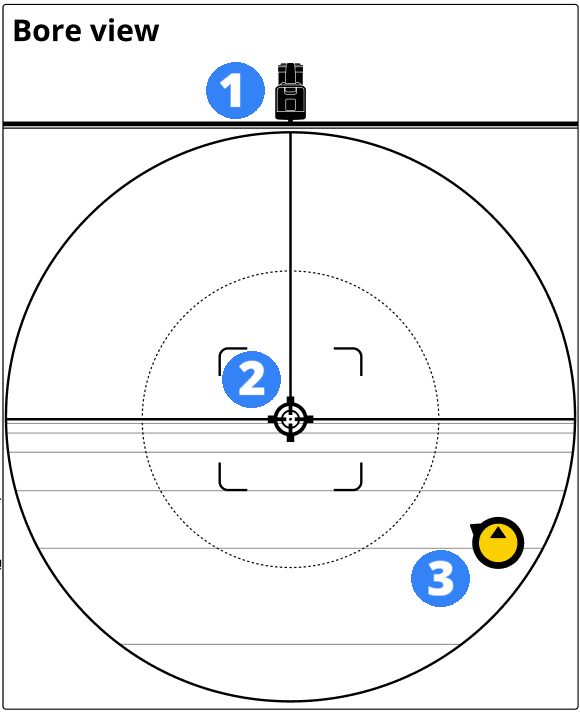
- The locator
- The locator target
- Transmitter (yellow ball with arrow in direction of target)
Side view (transmitter on target from drill to left)
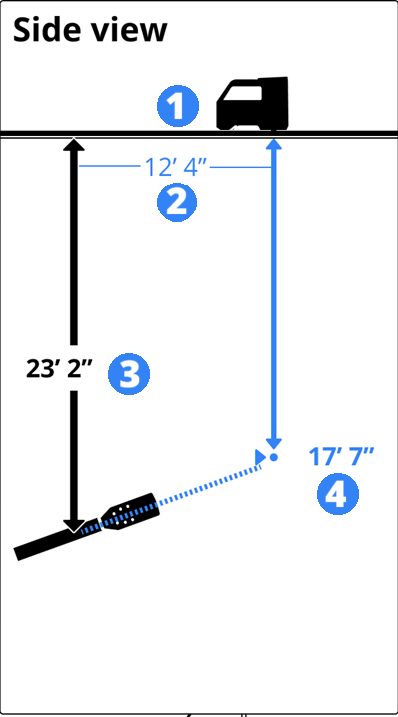
- The locator
- Distance from transmitter in drill housing to locator target
- Estimated projected depth of transmitter in drill housing
- Target depth
Roll sequences are used to change settings on the transmitter while it is underground. The drill operator rotates the drill head in a specific sequence and holds positions for predetermined times. To assist with the roll sequence, the RD8 displays the desired sequence with a timer.
Aurora users. This feature is similar to the XR app.
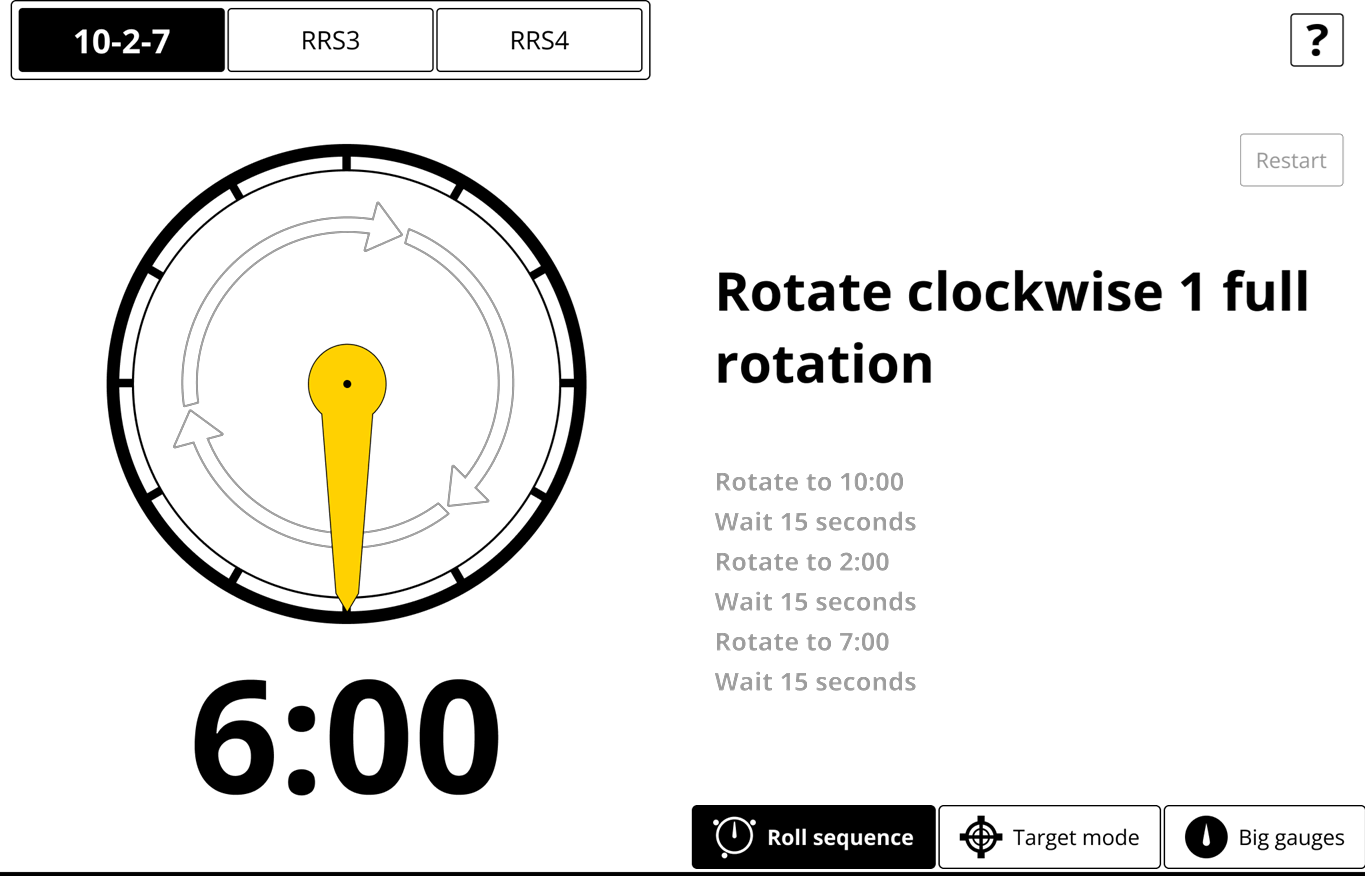
The 10-2-7 roll sequence requires that the clock position be held at a designated position for a specific amount of time. The display shows you the clock position and a timer for how long to hold it there.
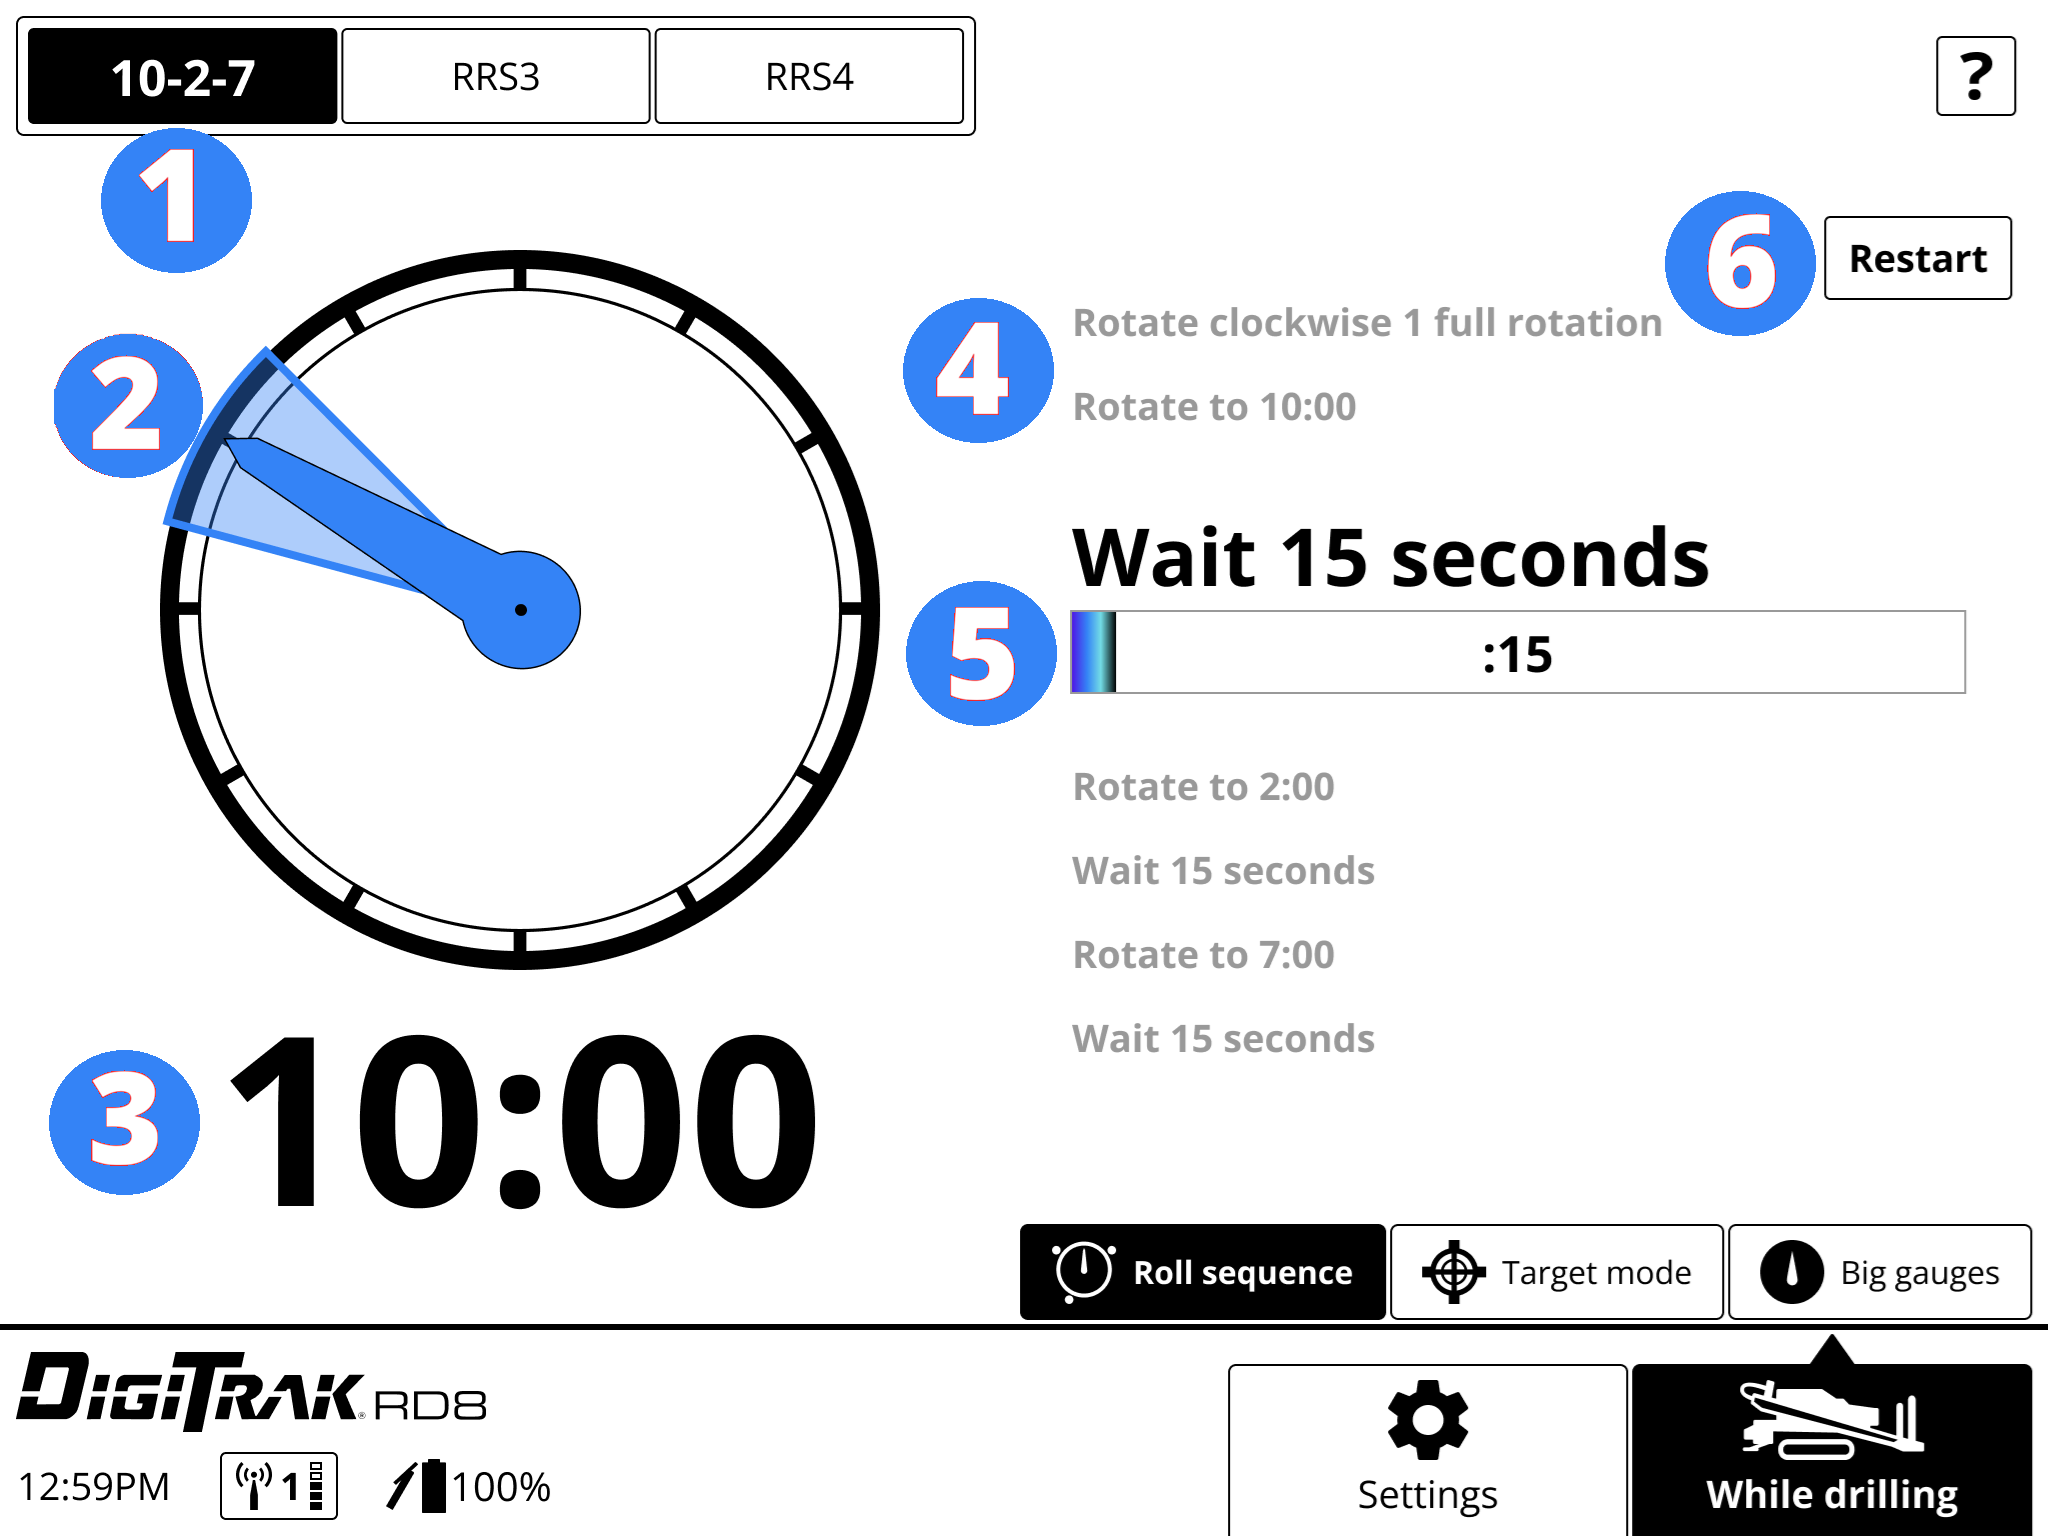
- Selected roll sequence
- Clock with blue needle in current position
- Current clock position
- Steps (current step highlighted)
- Timer
- Restart button
A repeating roll sequence counts the number of rotations in a direction with timed pauses. For each step, the display tells you how many times to rotate the drill head, and then a timer counts down how long to hold it there.
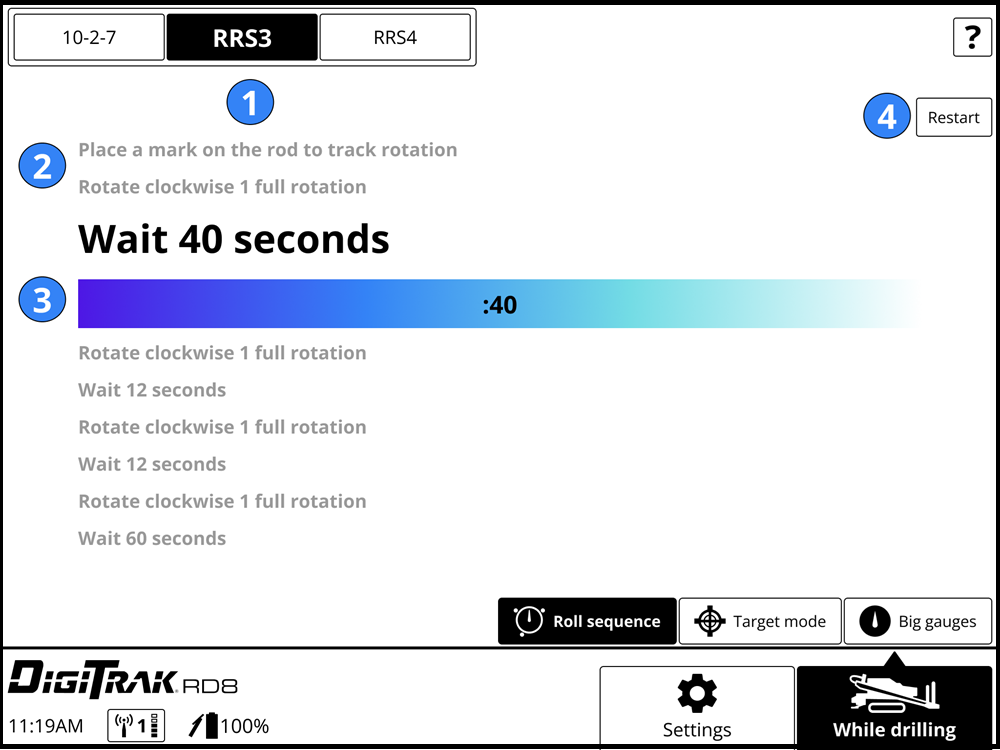
- Selected roll sequence
- Steps (current step highlighted)
- Timer
- Restart button

Before starting a repeating roll sequence (RRS3 or RRS4), mark your rod so you can visually confirm the rotation.
Registering your DCI equipment at myDCI.digital-control.com allows you to:
- Activate product warranties
- Obtain and assign subscriptions to equipment, such as Trak-It for ARES Genesis locators and displays, the R1 App for bore planning, or the LWD App for transferring bore logs to a device
- Enable Trak-It theft tracking options for ARES Genesis locators and RD8 displays.
For more information about the myDCI portal and registering your equipment and purchasing subscriptions, go to the myDCI manual in the DigiGuide App.
Registering your DCI equipment at myDCI.digital-control.com allows you to:
- Activate product warranties
- Obtain and assign subscriptions to equipment, such as the LWD App for transferring bore logs to a device
- Enable Trak-It theft tracking options for ARES Genesis locators and RD8 displays.
For more information about the myDCI portal and registering your equipment and purchasing subscriptions, go to the myDCI manual in the DigiGuide App
Install the RAM mount in a solid location and tighten the ball at the desired angle.
Connect the round keyed connector on the power cable to the back of the display and the other end to a 10-28 VDC accessory port. The display turns on automatically.
Connect the telemetry antenna.
Power on the locator. The Big gauge screen opens automatically.
Verify the telemetry channel shown on the bottom of the screen matches your locator's telemetry channel.
If needed, tap and hold the telemetry channel on the remote display to change the telemetry channel, the locator, or the telemetry region.
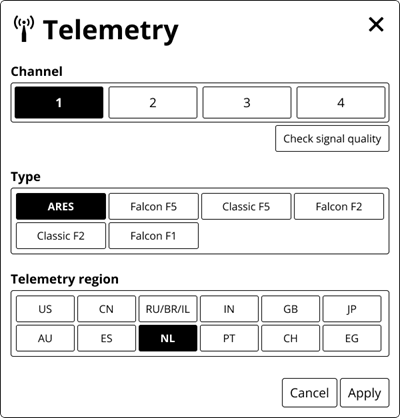
If the signal strength is poor, change the telemetry channel on the locator and then change the channel to match. To save the change, on the Telemetry screen, tap 'Apply'.
Before You Start

You can download software updates for your display with any available features and upgrades for your RD8 over Wi-Fi, including stable mobile hotspots. The display disconnects automatically from Wi-Fi after the update is complete.
For more information about connecting to Wi-Fi on your display, see the article Manage Wi-Fi connections.
For a list of what is in previous software updates and the current software version, go to article, What is the latest RD8 software version? article in DCI Help Center.
Some software updates are optional. However, some features and functionality will not be available without the current software. If a software update is available, a message is displayed on the equipment page on the myDCI portal. You can also connect to Wi-Fi and check for updates in Settings.
Tap Settings.
On the Settings page, tap Software update.
Select the network to use and then enter the password using the display keyboard. The display will remember the password the next time you connect.
If a Wi-Fi network is hidden and doesn't broadcast their SSID, you can still connect to these networks if you know: 1) the network name or SSID 2) the type of encryption used by the network 3) the network password.
After connecting, the display checks for updates.
- If the software is up-to-date, the current version is displayed, with a message. Select Close to return to the Settings menu.
- If the software needs an update, select Download and Install, and then select Begin update. When the update is complete, the locator will restart.
- If the update fails, contact DCI Customer Support.

Do not turn off the display or switch screens until the update is complete. Time to update will vary depending on connection speed and may take several minutes. If the display is connected to a battery, make sure the battery is at least half full, so that the update is not interrupted.
Ensure antenna and display connectors are free of debris and that the antenna pin is straight and intact.
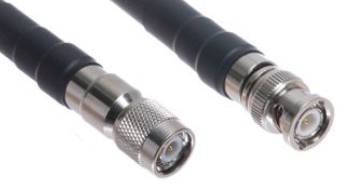
Connect the telemetry antenna.
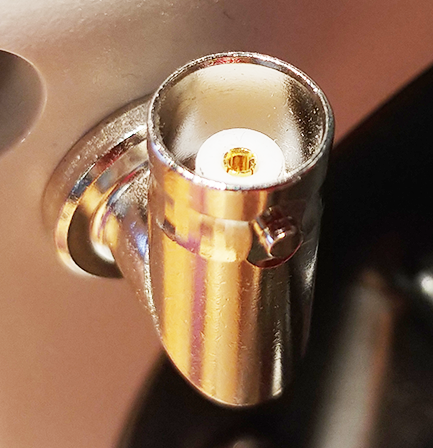
For long whip and Yagi antennas – Mount the antenna as high as possible and on a metal surface for maximum signal reception.
With the transmitter and locator paired and powered on, verify that data like pitch, roll, and temperature displays on the Big gauges screen.
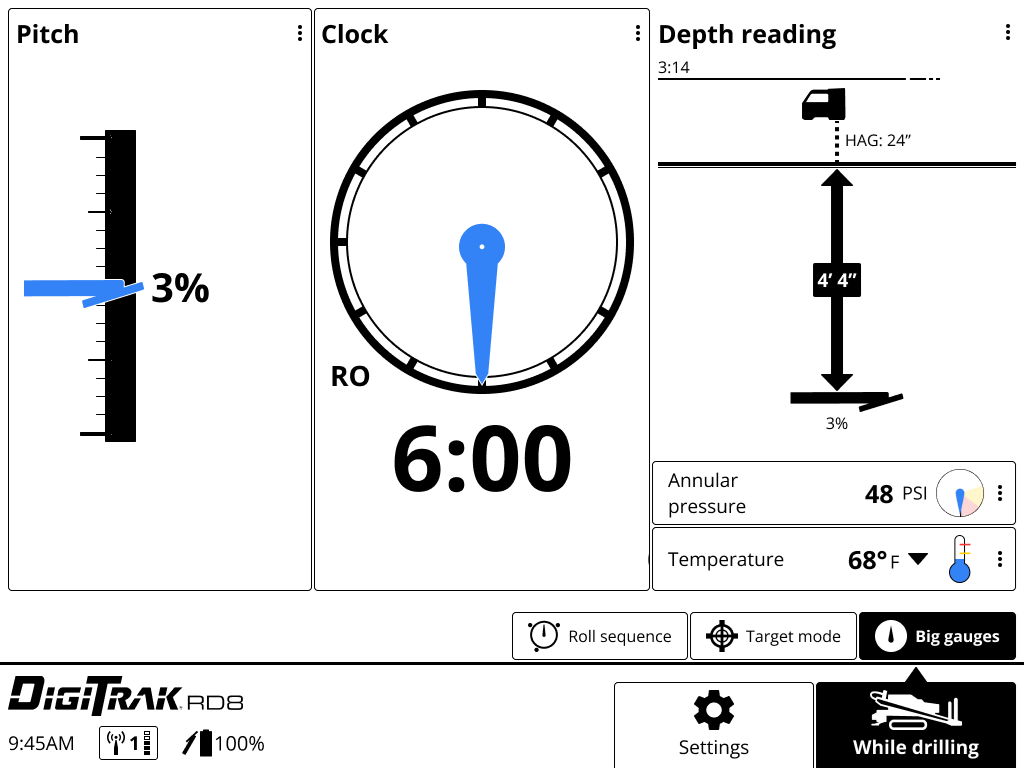
Roll the transmitter to ensure the roll clock moves correspondingly.
Data displays on the Big gauges screen as soon as the locator receives data from a transmitter.
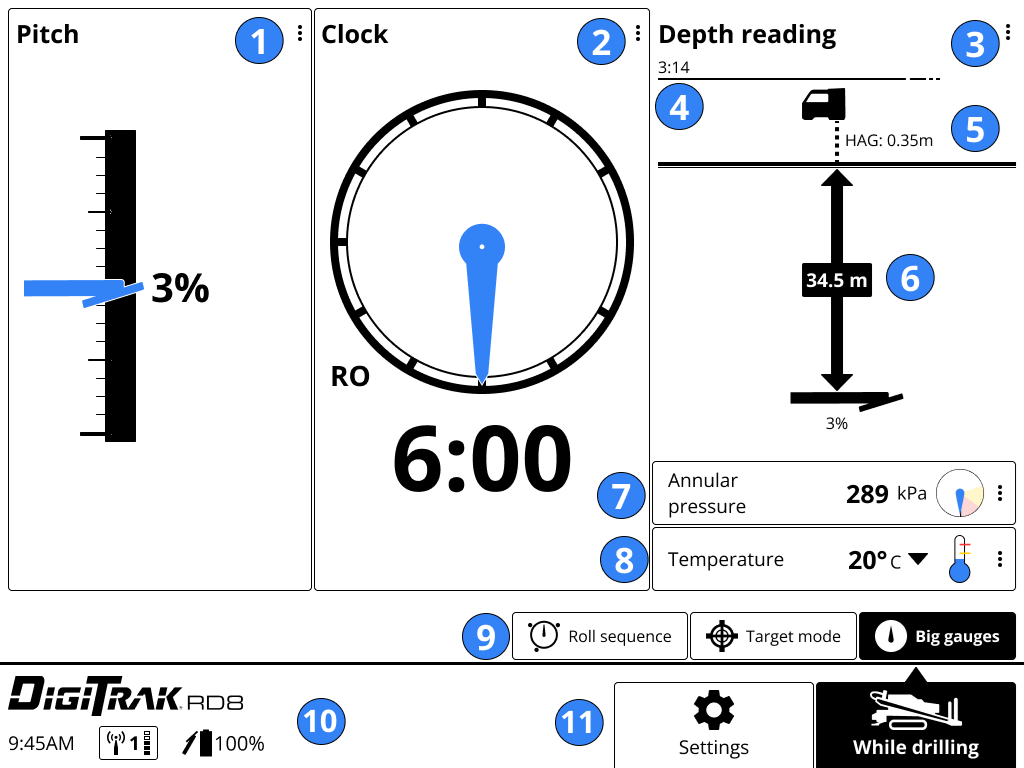
- Pitch pane with gauge
- Clock panel with 24-position clock (roll offset displayed)
- Depth reading pane
- Timer from last depth reading
- HAG (Height Above Ground)
- Depth/Estimated projected depth reading sent from the locator
- Annular pressure and warnings
- Transmitter temperature and warnings
- While drilling features (Big gauges selected)
- Status (time, telemetry channel, and strength, transmitter battery life)
- Screen buttons (While drilling selected)
When the locator sends a depth reading at the Locate Line (LL), RD8 displays transmitter information in the Depth reading pane.
- Depth data timer
- HAG on and height (If HAG is off, the locator will be on the terrain line.)
- Depth
- Pitch at the time of reading.
The data remains for five minutes, which is counted down by the timer at the top of the Depth reading pane. A new depth reading will restart the timer.
Aurora users. The Depth reading pane is not highlighted in blue for the first ten seconds.
A depth reading taken at the Rear Locate Point (RLP) will still display a projected depth, but because the locator cannot distinguish between FLP and RLP, it will be inaccurate.
After five minutes, the depth reading expires and disappears from the screen. Tap Recall the last reading, to display the information again in a popup window.
Before You Start
Switching bands on the transmitter may provide better data, better depth, and/or better locate results as interference conditions change. Roll sequences (rotating the drill head to certain clock positions) allow drill operators to change the transmitter frequency without leaving the drill rig.
- 10-2-7 *- Use when clock data is available
- RRS3 * - Use when clock data is unavailable
For SnooZe *-compatible transmitters, when SnooZe mode is enabled, use RRS4 *to turn the transmitter signal on or off to save battery life.
On the While Drilling screen, tap the Roll sequence tab.
Tap the roll sequence you want to start. The roll clock and instructions for the sequence are displayed.
If a roll offset * has been enabled on the locator, you can:
- Enter the roll offset and select Apply to continue.
- Disable roll offset on the locator and then restart this roll sequence. See the DCI DigiGuide manual for the locator to learn how to disable roll offset. Don't forget to reenable roll offset on the locator before starting to drill.
Move the drill head according to the directions on the screen. The clock needle shows the current position of the drill head and is yellow when you start the sequence. The steps for the sequence displays on the right with the current step in bold.
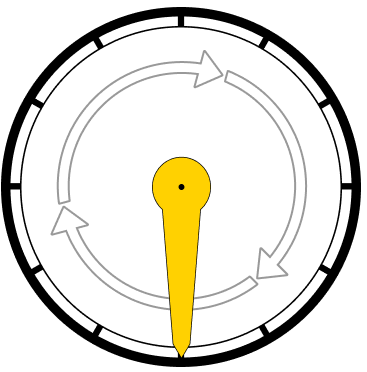
Rotate the needle a full rotation clockwise. The yellow needle turns blue when the rotation is complete. An outline of the needle shows where the needle started the rotation.
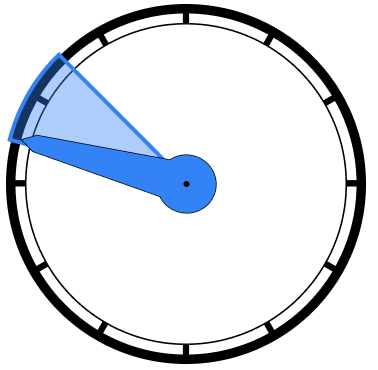
Rotate the needle to the specific clock position indicated by the blue wedge. The needle turns blue when it is in the correct position and the timer counts how long to hold it there.
If you do not rotate the drill head to the correct position and hold it for the prescribed time, the change will fail. Tap 'Restart' to restart the roll sequence.
When the sequence is complete, the display beeps. Switch the active frequency on the locator. If roll offset was disabled, re-enable it on the locator.
See the DCI DigiGuide manual for the locator for instructions.
Tap Big gauges to verify the frequency change was successful and transmitter data is displayed on the display.
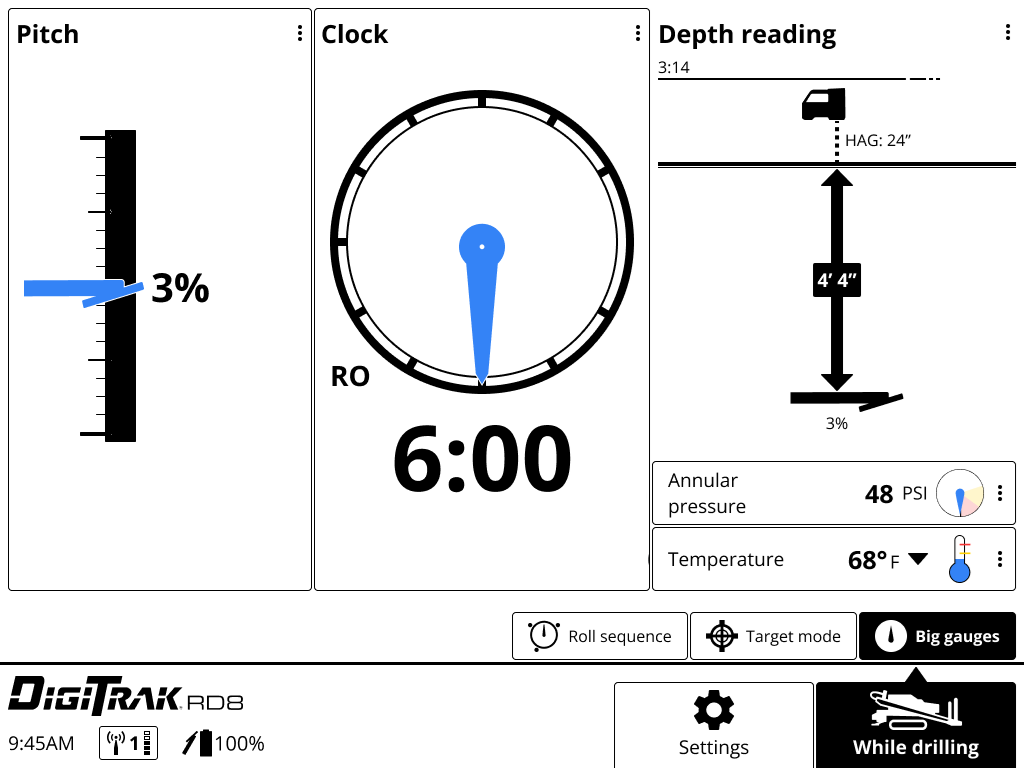
If data is not displayed, verify that the frequency was changed on the locator and that the locator is displaying data. Repeat the roll sequence, if needed.
If you disabled roll offset on the locator, re-enable it before continuing. See the DCI DigiGuide manual for the locator for instructions.
Following the rotation sequence changes the transmitter frequency. Make the following rotations and hold for the specified time.
1. Rotate clockwise 1 full rotation, wait 20 seconds.
2. Rotate to 10:00, wait 15 seconds.
3. Rotate to 2:00, wait 15 seconds.
4. Rotate to 7:00, wait 15 seconds.
The sequence can be executed either manually or assisted by Aurora® Display's XR® App or the RD8 Roll Sequence.
Repeating a roll sequence three times with specific timed pauses between changes the transmitter frequency down-hole.
1. Mark the rod to track rotation.
2. Rotate clockwise 1 full rotation, wait 40 seconds.
3. Rotate clockwise 1 full rotation, wait 12 seconds
4. Rotate clockwise 1 full rotation, wait 12 seconds
5. Rotate clockwise 1 full rotation, wait 60 seconds
The sequence can be executed either manually or assisted by Aurora® Display's XR® App or the RD8 Roll Sequence.
For transmitters with SnooZe mode, the transmitter can be turned off down-hole and turned back on as needed with an RRS4 roll to extend battery life.
Repeating a roll sequence four times with specific timed pauses between activates SnooZe mode, which turns the transmitter signal on and off while it is down-hole.
1. Mark the rod to track rotation.
2. Rotate clockwise 1 full rotation, wait 40 seconds.
3. Rotate clockwise 1 full rotation, wait 12 seconds.
4. Rotate clockwise 1 full rotation, wait 12 seconds.
5. Rotate clockwise 1 full rotation, wait 12 seconds.
6. Rotate clockwise 1 full rotation, wait 60 seconds.
It can be executed either manually or assisted by Aurora® Display's XR® App or the RD8 Roll Sequence.
When the drill bit and the housing are two separate pieces, and their roll positions do not match, the locator can compensate to match the transmitter's 12 o'clock position to the drill bit's 12 o'clock position. If the Roll Offset feature is enabled, an RO appears in the bottom left corner of the roll clock.
Use a microfiber or soft cotton cloth with water and a mild liquid detergent to clean the screen and case.
Commercial cleaning products will damage the screen’s protective coating.
Do not pressure wash.
Carefully remove and store the antenna in the carry case to prevent damage.
If available, place the protective plastic cover over the screen.
If the display can be removed from the rig, store it in the system carry case away from impact, moisture, and excessive temperatures.
Storage and transportation temperature must remain within -40° – 149°F (-40° – 65°C).
You can change your display to your personal preferences.
- Distance and depth units (inches, decimal feet, or metric)
- Temperature (Fahrenheit or Celsius) and set red and yellow alert levels
- Annular pressure (PSI Kpi, or Bar) and set red and yellow alert levels
- Pitch gauge (percent or decimal)
- Languages *
- Display light or dark mode
- Date and time
On any screen, tap Settings.
Select the display feature you want to change.
Tap the option you want, make any changes, and then tap Apply or Okay. Changes to the display are immediate and do not change the locator's settings.
English (US)
Bengali
汉语 (Chinese)
Dansk (Danish)
Nederlands (Dutch)
Français (French)
Deutsch (German)
हिन्दी, हिंदी (Hindi)
Italian (Italiano)
Polski (Polish)
Português brasileiro (Portuguese Brazil)
Português de Portugal (Portuguese - Portugal)
Español (Spanish)
Русский (Russian)
Before You Start
A stable Wi-Fi connection is required to check for software updates. Known networks are the Wi-Fi networks that your device has previously connected to and saved to use in the future, including passwords. You can "forget" networks you no longer want to use and remove them from the list.
If the password has changed, you may need to re-enter it or forget the saved network and reconnect and re-enter the password.
Go to Settings, tap Wi-Fi.
Under Known Networks, select the network to forget and remove from the list.
Tap Forget.
Tap the X in the top corner of the Wi-Fi screen to return to the Settings screen.
Before You Start
A Trak-It subscription on the myDCI portal allows you to track the current location of some types of DCI equipment. The equipment location maps are updated twice daily. If equipment is marked as stolen in the myDCI portal, the update frequency increases. For some equipment, users can be locked out if needed.
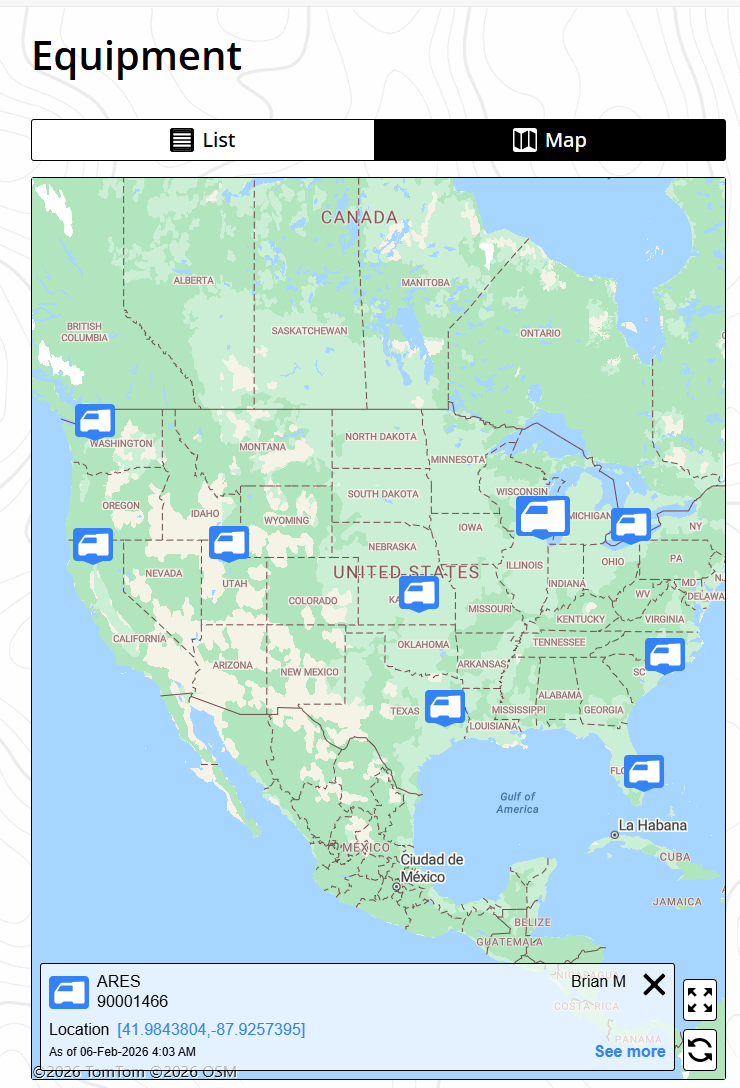
As of September 2026, you can track ARES locators and RD8 remote displays and lock out users on ARES locators.
Digital Control Inc. is not responsible for reporting equipment as stolen to the authorities. The history of the equipment's movement is not available on the myDCI portal.
Go to https://mydci.digital-control.com, and on the left pane, select Equipment.
Select the unit with an active Trak-It subscription. The location maps on this page and in Equipment display the unit's last known location with a date and time stamp.

On the equipment detail page, select the Options icon in the top right corner.

Select Mark as stolen, and then on the Mark as stolen screen, select the option you want:
- Silent alarm - Updates the GPS location every hour until the internal battery is depleted. There is no other notification.
- Lockout - (ARES locators and RD8 displays only) Prevents anyone from using the equipment. A lockout message is displayed.
You can change the selected option or revert to normal tracking at any time.
Things You Should Know

Target mode (ARES) and Target Steering * (Falcon) should only be used to maintain a straight path underground with minimum pitch changes. See additional warnings in the DCI DigiGuide manual for your locator.
Up/down steering assumes level pitch and should not be used for significant pitch changes. Projected depth on the remote display accounts for pitch and should be used for steering decisions when making pitch changes.
The DCI target steering * algorithm brings the drill head below the locator at the programmed target depth * at 0 % pitch.
There may be cases where the approximate projected depth is getting increasingly deeper (or shallower) than desired, and the steering indicator ball indicates more steering is required. This is because additional vertical turning may be required to allow the drill head to become level below the locator. These potential discrepancies should be temporary and disappear as the pitch readings approach 0%. See the Troubleshooting Chapter for a detailed explanation.
Once the target depth * is set on the locator, the display automatically opens the Target mode screen. The Target mode tab is highlighted on the menu.
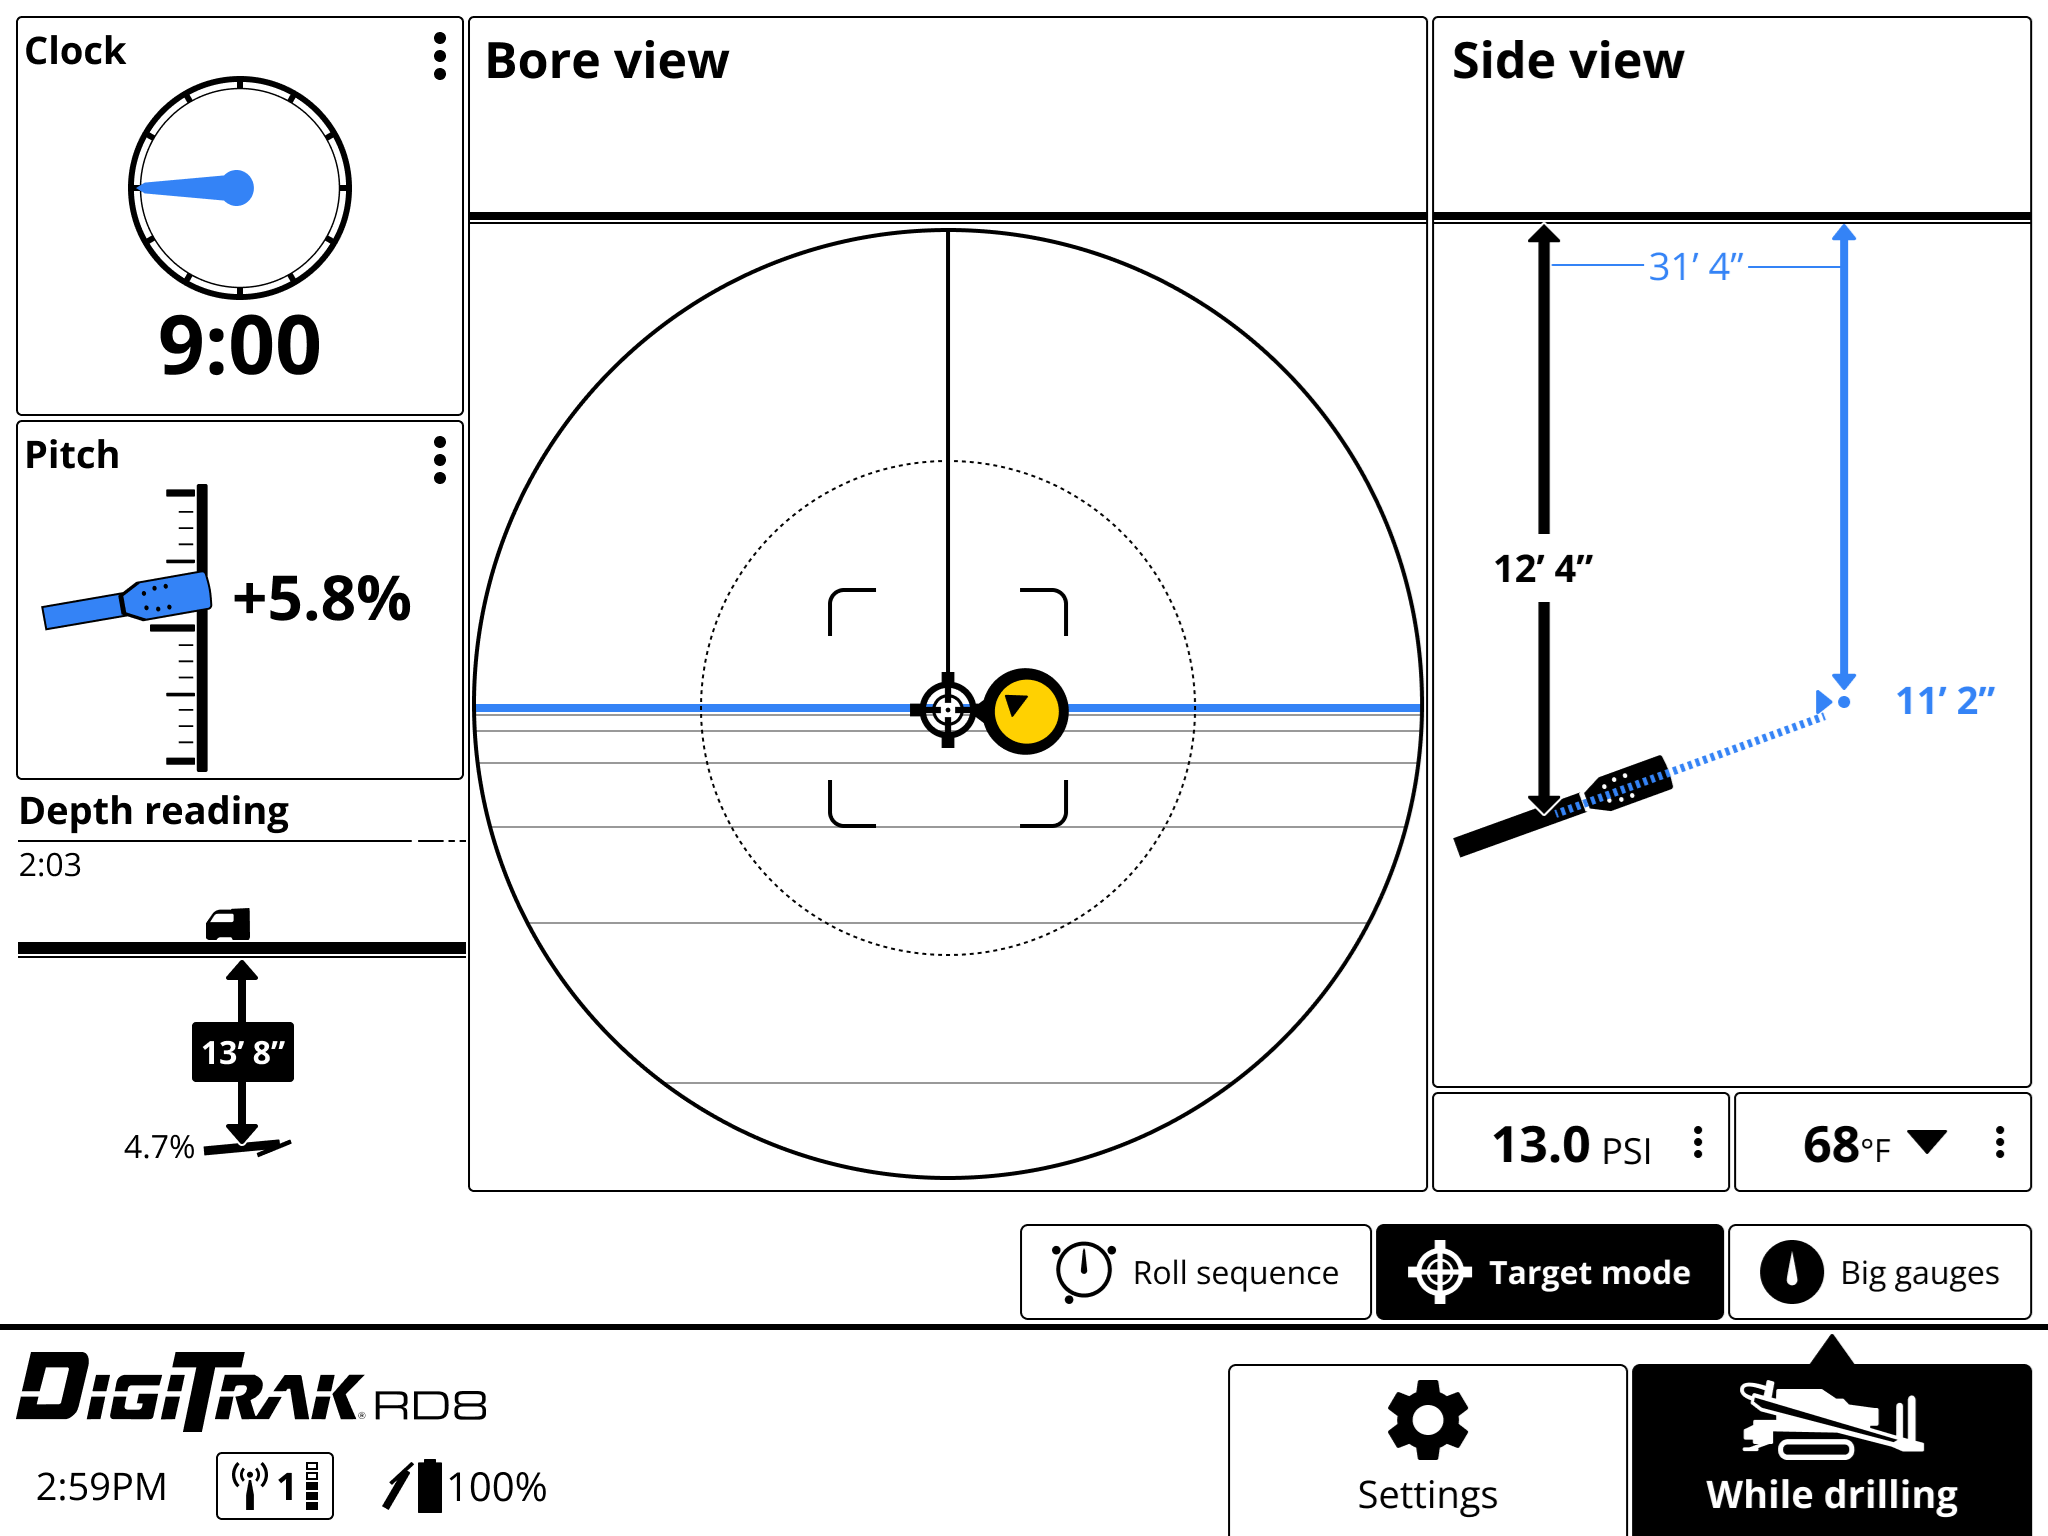
Use Target mode to view whether your current steering is on target. The ball is the current position of the transmitter relative to the target. If the ball is black, the drill is off target. The arrow on the ball indicates the direction of the target.
This screen example shows that the drill head is off target and is currently calculated at 12' 4" below the horizontal plane of the locator and the target is 31' 4" ahead. If the drill head stays on the same pitch, the projected depth at the target will be 11'2".
The further the drill head is from the locator, the less accurate the estimated projected depth can be. This should therefore only be used as an estimate.
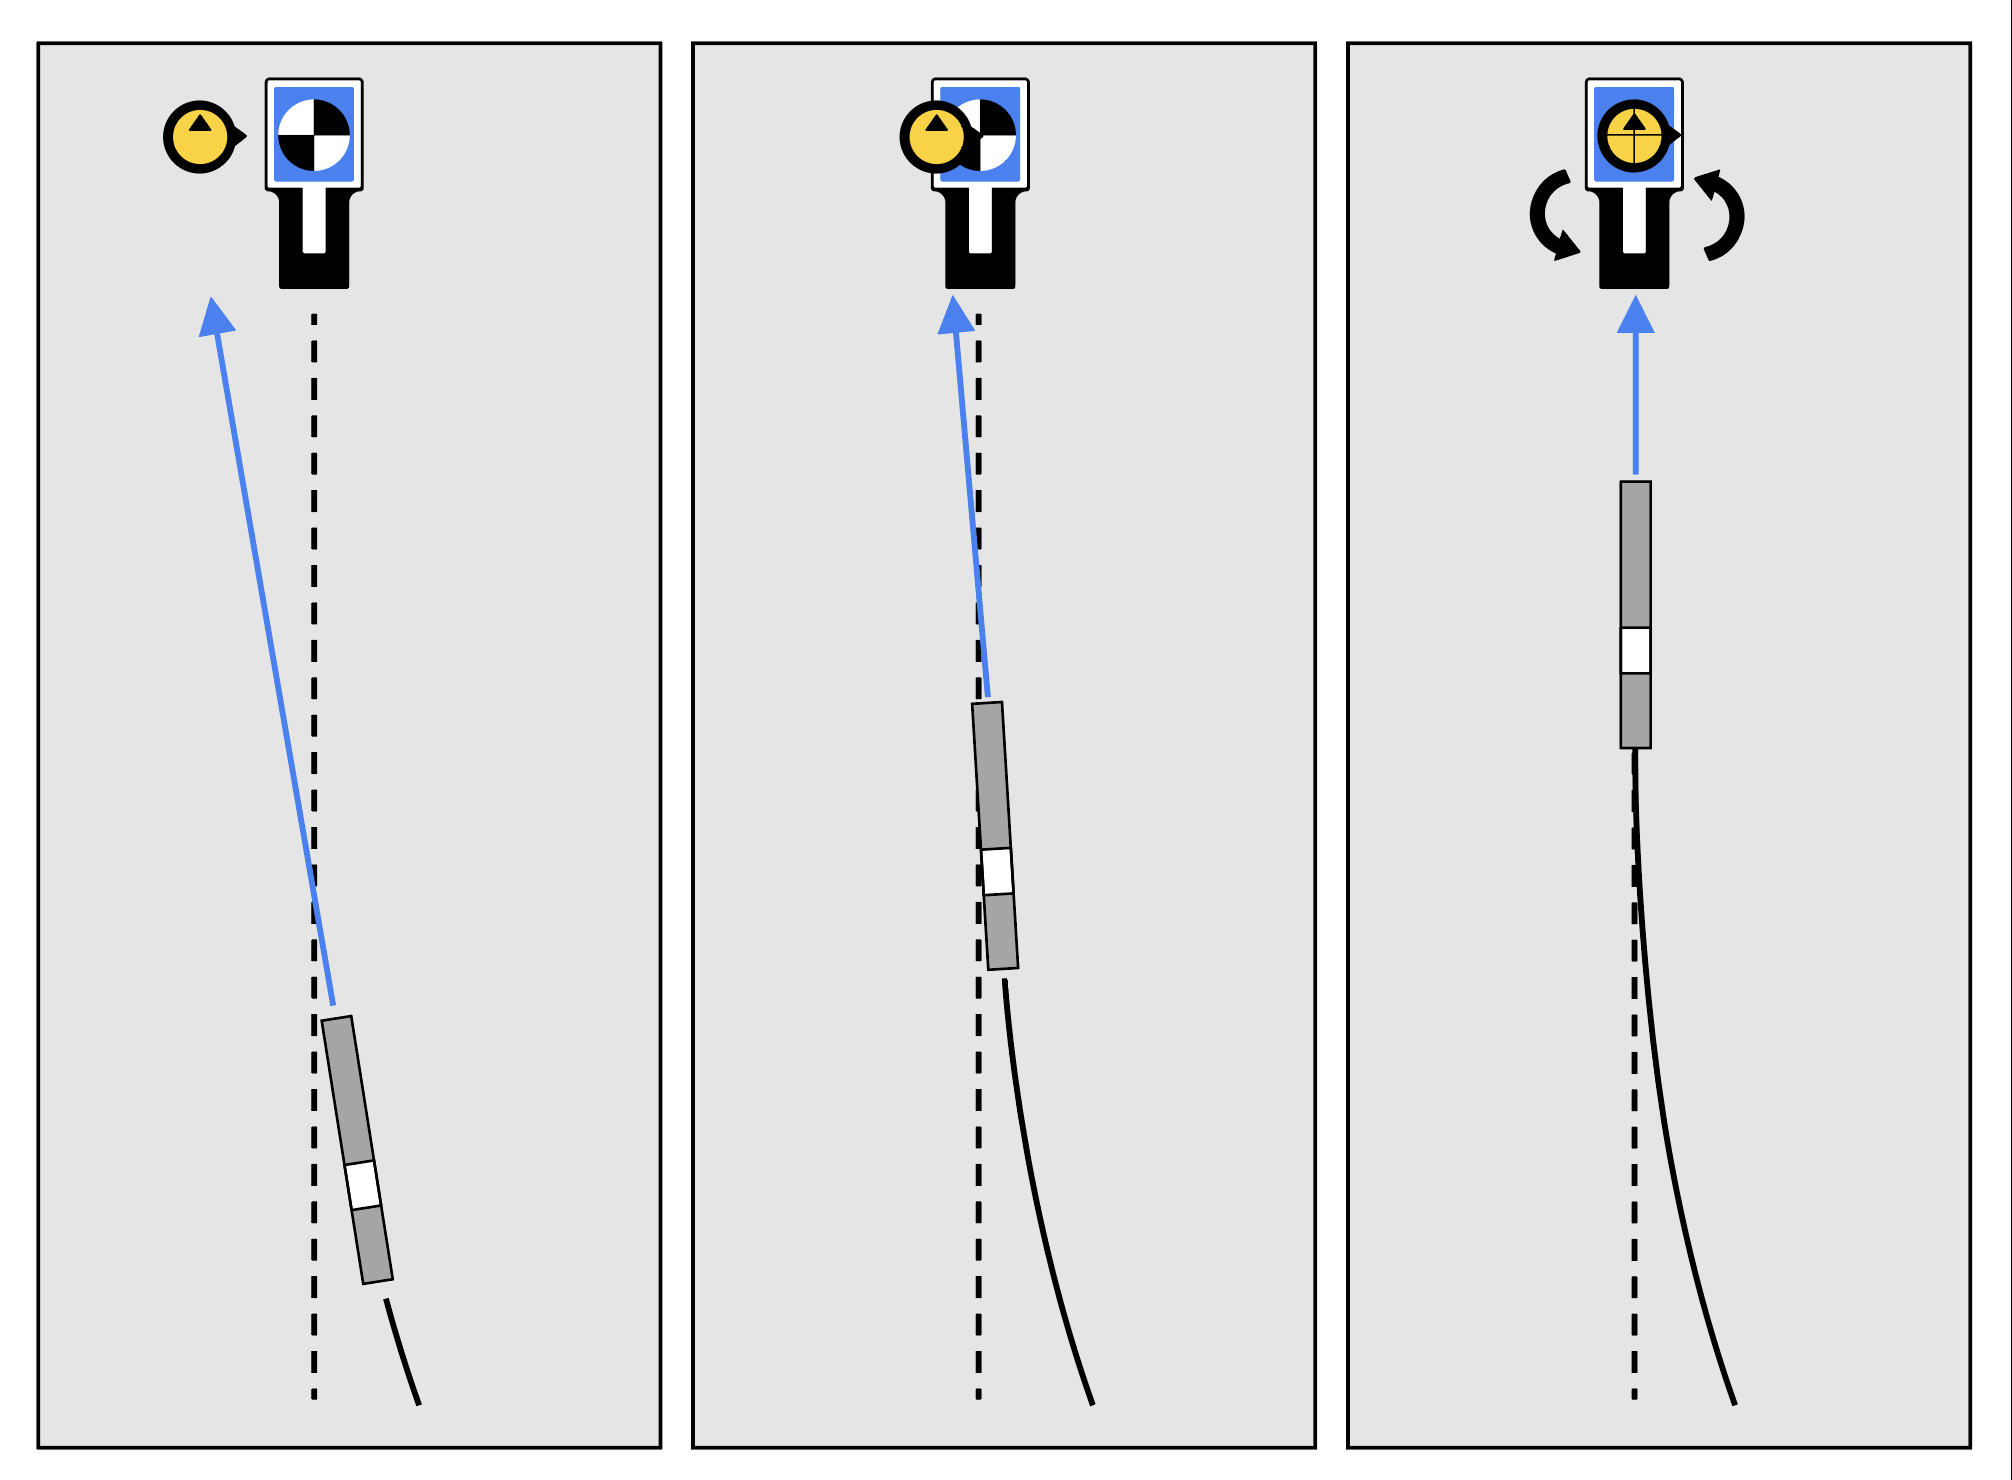
Make small steering adjustments as needed to bring the steering indicator ball toward the target.
The closer the drill head is to the locator, the more sensitive the steering indicator will be.
When the steering indicator is centered on the target and the lines and ball are blue, the drill head is correctly positioned to drill toward the target.
This screen shows the drill head correctly aligned to reach the target at 15'8" ahead with an estimated projected depth of 4'11", and the drill head is currently 4'11" below the horizontal plane of the locator.
When the horizontal distance is almost the same as the current depth, ensure the locating specialist moves the locator farther out to continue Target mode.
If the drill head passes this point and the steering ball is not centered, the steering guidance on the remote may be inaccurate. If the horizontal distance reaches zero, then all steering data past that point is incorrect.
Tap While drilling to stop viewing the target steering data.
The 'Target mode' tab is available until the display is powered off regardless if target steering data is being received.
The "estimated projected depth" in Target mode/Target Steering is the depth the drill head is projected to be at below the locator when it reaches the destination if the user maintains the current pitch reading.
You can gauge the depth the drill head might be when it reaches the target below the locator. The further the drill head is from the locator, the less accurate the estimated projected depth can be. This should therefore only be used as an estimate.
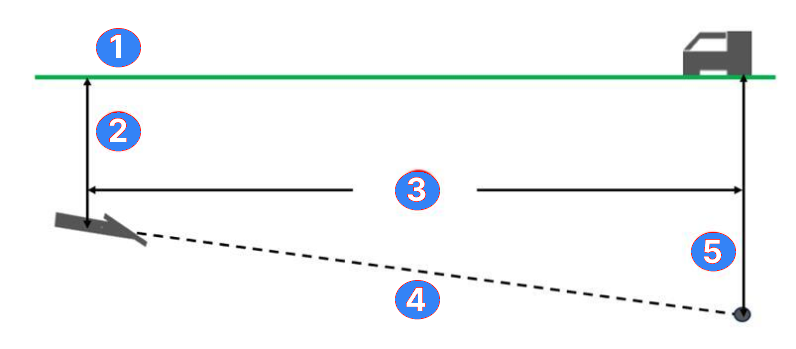
- Terrain
- Locator Depth *
- Distance
- Pitch
- Estimated Projected Depth *
There may be cases where the estimated projected depth is getting increasingly deeper (or shallower) than desired, and the steering indicator ball indicates more steering is required. This is because additional vertical turning may be required to allow the drill head to become level below the locator. These potential discrepancies should be temporary and disappear as the pitch readings approach 0%. See the Troubleshooting Chapter for a detailed explanation.
A value programmed into the locator, so it can be positioned ahead of the drill head and used as a steering target. The value programmed should be the desired depth of the transmitter when it reaches the point below the locator. If a locator is placed above ground level, such as to provide separation from interference, that height must be added to the target depth.
Note: If using a Falcon Compact Display, only left/right steering information is available. The locator used with the Falcon Compact Display must still have a target depth set. This target depth can be any value.
A value programmed into the locator, so it can be positioned ahead of the transmitter housing and used as a steering target. The value programmed should be the desired depth of the transmitter when it reaches the point below the locator. If a locator is placed above ground level, such as to provide separation from interference, that height must be added to the target depth.
Note: If using a Falcon Compact Display, only left/right steering information is available. The locator used with the Falcon Compact Display must still have a target depth set. This target depth can be any value.
The depth displayed on the locator to the transmitter.
The depth the drill head is projected to be at when it reaches the destination below the locator at the current pitch while using Target Steering.
Before You Start
The Target mode guidance method allows the locator to be placed ahead of the drill head and used as a steering target.
Use it to distance the locator from rebar that is causing signal interference and to drill where walkover locating is not possible.
Target mode should only be used on a straight drill path, not on a curved path, terrain changes, or to correct a significantly off-course bore.
Remote steering is Target mode (Target Steering) without a target depth or if the target more than 35 feet ahead of the transmitter.
When Target mode (Target Steering) is enabled on the locator, the remote display automatically opens the Target mode view and the Target mode tab is highlighted.
If you have a target depth, you will see the standard Target mode screen and can use up/down steering as well as right/left. Go to the article Locate with Target mode for more information.
If you do not have a target depth, you can use Target mode for remote steering with only left and right corrections. The Target mode changes to a "canyon view" with no pitch information in the bore view panel.
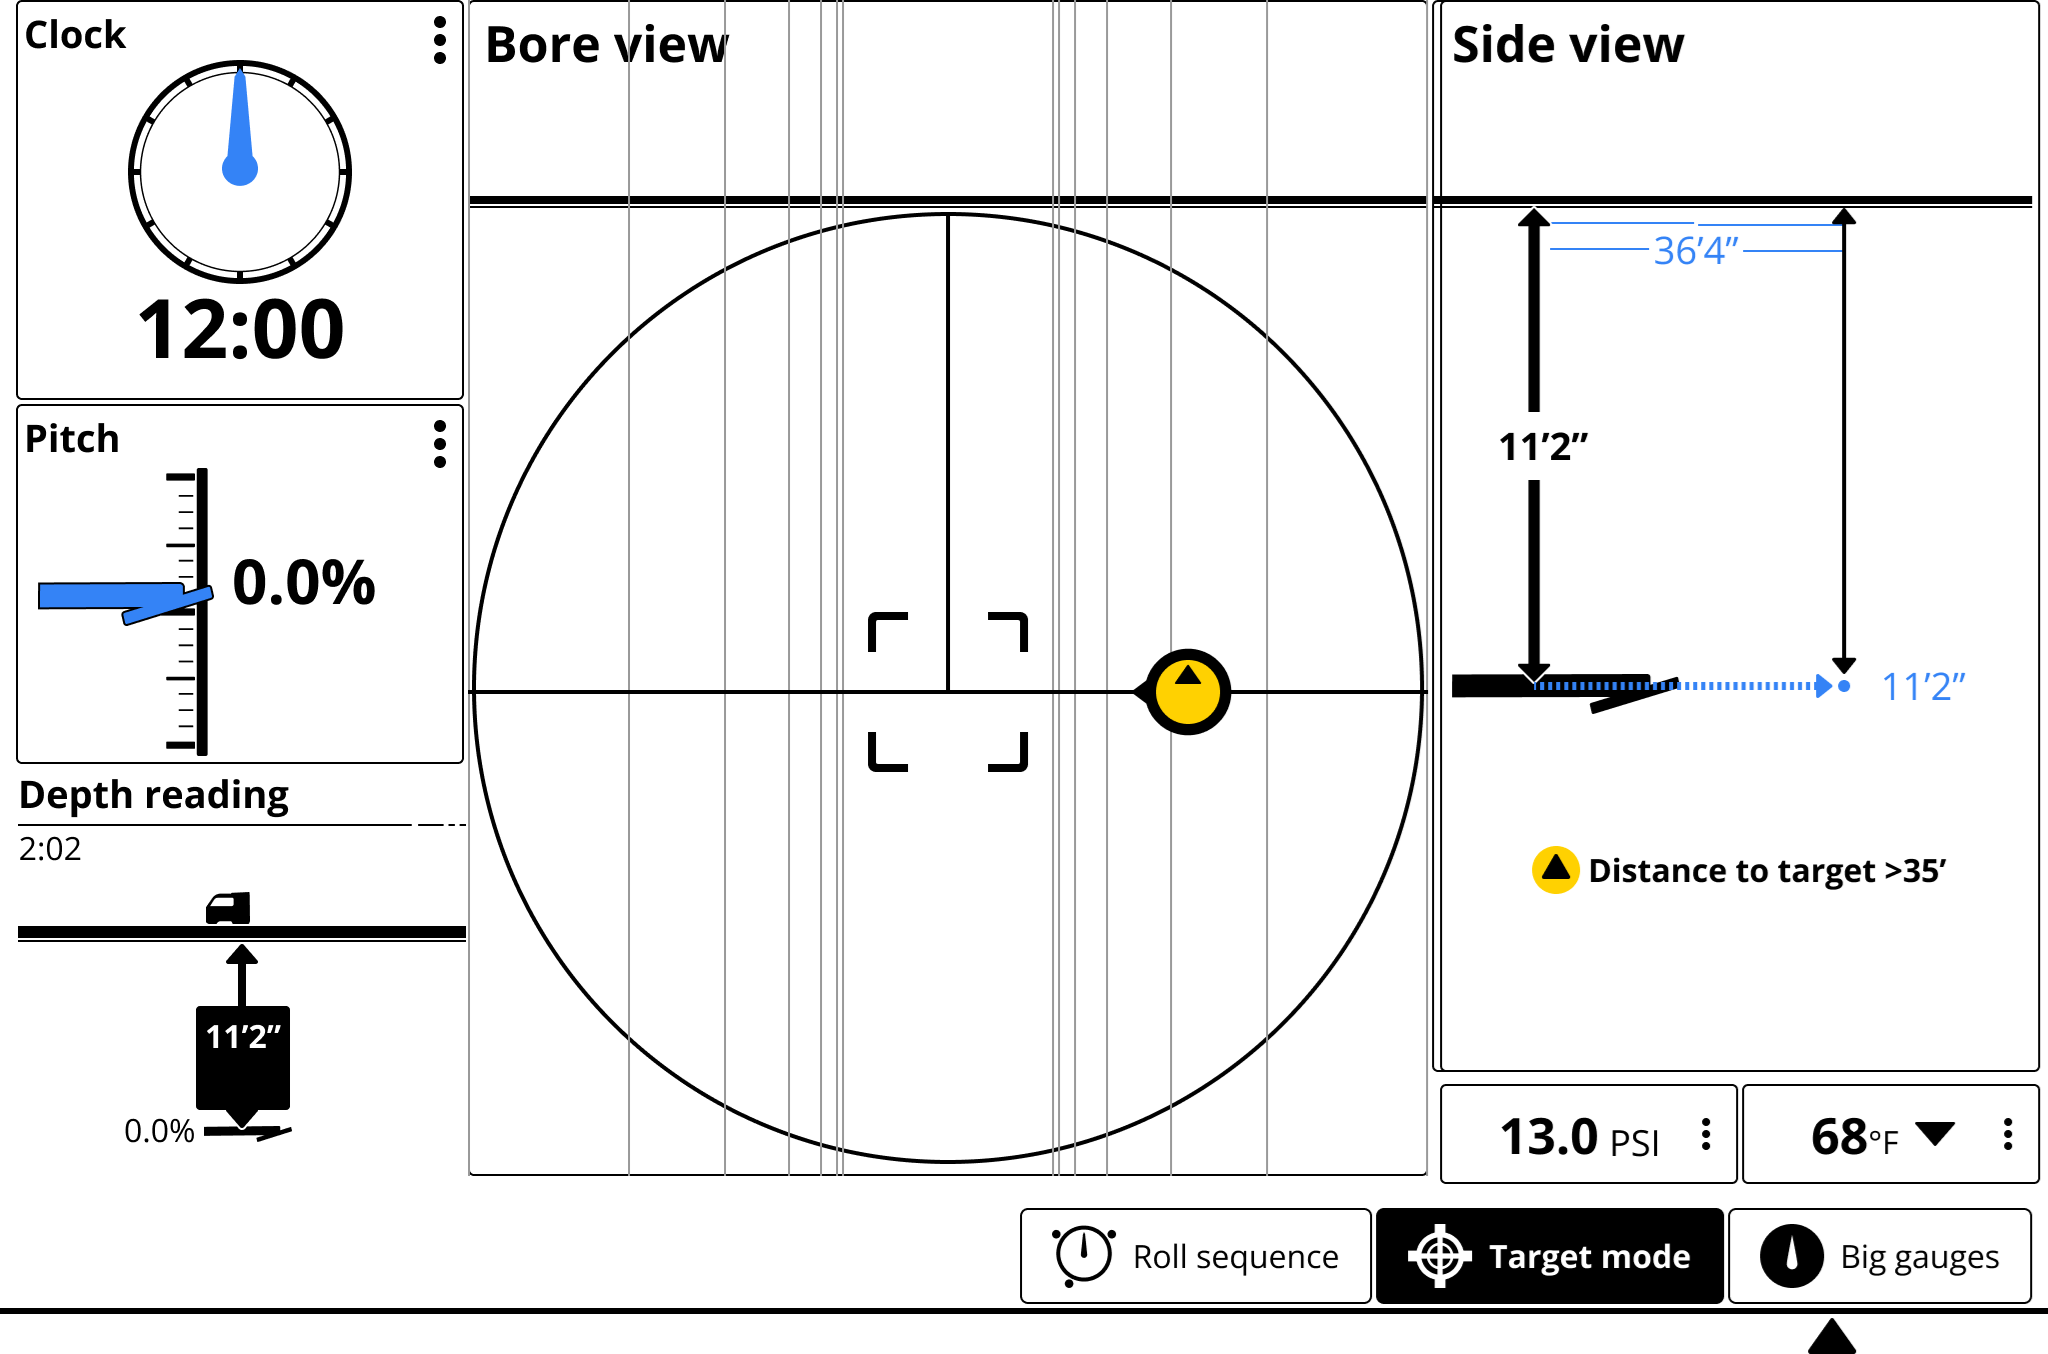
Use Target mode to view whether your current steering is on target. If the ball is black, the drill is off target. The arrow on the ball indicates the direction of the target.
Make small steering adjustments as needed to bring the steering indicator ball toward the target.
The closer the drill head is to the locator, the more sensitive the steering indicator will be.
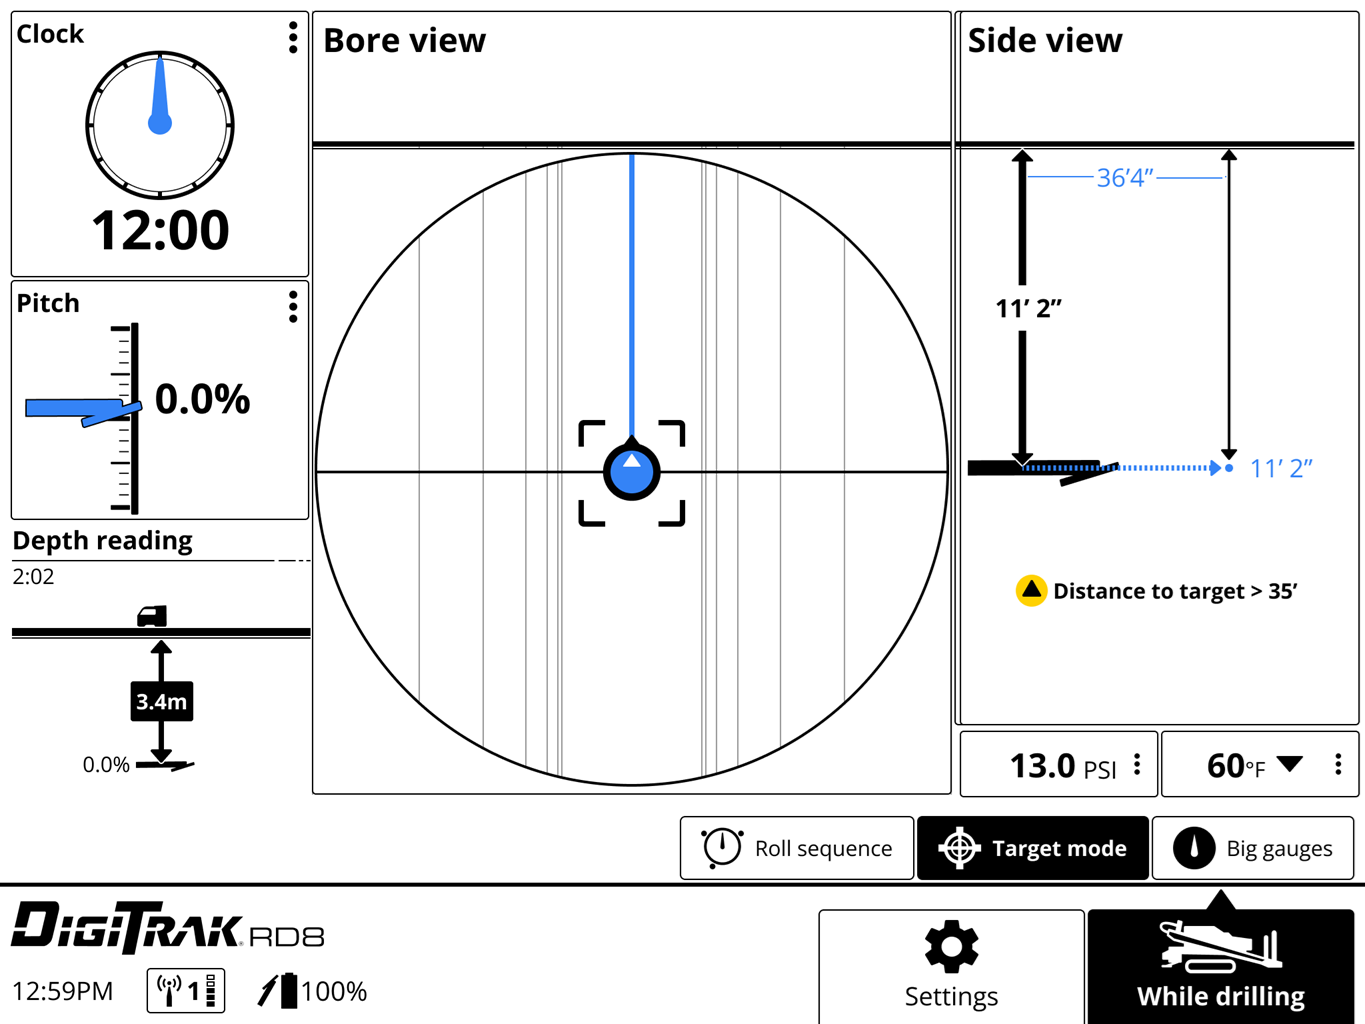
When the steering indicator is centered on the target and the lines and ball are blue, the drill head is correctly positioned to drill toward the target.
This screen shows the drill correctly aligned to reach the target in 36'4". The drill head is currently 11'2" below the horizontal plane of the drill with zero pitch.
When the horizontal distance is almost the same as the current depth, ensure the locating specialist moves the locator farther out to continue Target mode.
If the drill head passes this point and the steering ball is not centered, the steering guidance on the remote may be inaccurate. If the horizontal distance reaches zero, then all steering data past that point is incorrect.
Before You Start
The telemetry signal transmits data between your remote display and the locator. The more bars on the telemetry strength icon, the stronger the signal. You can choose the channel with the strongest signal; this may change from jobsite to jobsite.
The telemetry channel and strength is shown in the bottom left corner of the remote display screen and on the status bar of the locator.
The telemetry channel, locator type, and region must match on your display and on the locator.
Go to the Check signal quality screen to view a graph of the signal strength for each channel or background noise.
On the remote display, select the Settings button.
On the Settings screen, select Telemetry.
On the Telemetry screen, you can change the channel, the locator type, or the region.
To check the quality of the telemetry signal for different channels, select the Check signal quality button under Channel.
On the Check signal quality screen, a graph displays the strength of the telemetry signal being received by the remote display. The larger the peaks, the stronger the signal.
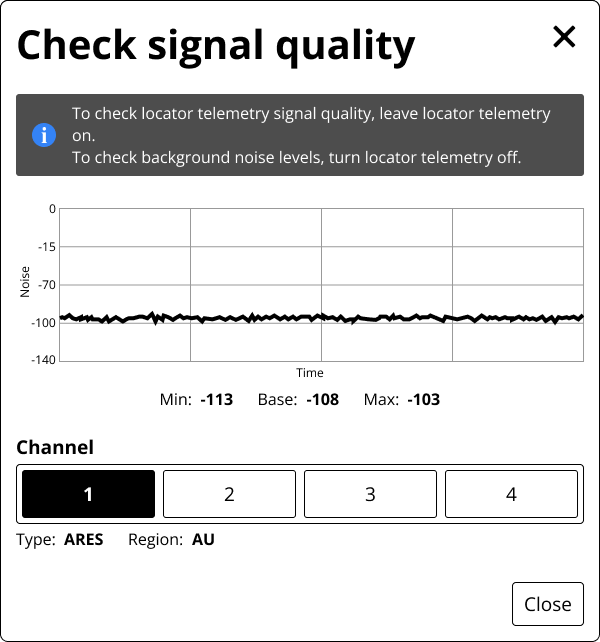
- To check the background noise, turn off the locator. This is the base amount of noise.
- To check the individual channels, turn on the locator and change the channel on both the locator and the remote display. The channel with the greatest signal height has the best signal.
Select Close to save any changes.
Select X in the top right corner to close the page without saving any changes.
Check for a software update
Some features are not available on the remote display at delivery. New features are made available with an over-the-air (OTA) update. For a list of the latest releases and the content, go to FAQ article on the RD8 page of the DCI Support site.
To check your display for the latest update:
- From any screen, tap Settings.
- On the Settings page, tap Software update.
- Connect to Wi-Fi.
After connecting, the display checks for updates.
- If the software is up-to-date, the current version is displayed, with a message. Select Close to return to the Settings menu.
- If the software needs an update, select Download and Install, and then select Begin update. When the update is complete, the display will restart.
- If the update fails, contact DCI Customer Support.
For more information on over the air updates, see the article, Update the display software over-the-air.
Check for myDCI subscriptions for the display and the locator
Some features require that the display is registered on the myDCI portal to your company and may require a current subscription.
- Go to https://mydci.digital-control.com and sign in.
- Under Equipment, locate this locator using the serial number.
The subscriptions are listed for each piece of equipment with their expiration date.
Only owners and managers can add equipment and subscriptions. If you cannot access the myDCI portal, ask your company's account manager to invite you.
Raise the locator off the ground and add Height-above-ground (HAG) to the locator
For steps to add HAG, see the locator manual in the DCI DigiGuide App.
Check telemetry channel, locator type, and world region
Verify the telemetry channel shown on the bottom of the screen matches your locator's telemetry channel.
If needed, tap the telemetry channel on the remote display to change the telemetry channel, the locator, or the telemetry region.
Check any external antenna on the remote display for damage.
Ensure all internal pins are intact and clean with alcohol if connection points look dirty.
If not already in use, a filtered antenna may be necessary to reduce the effects of interference in the area.
Call DCI for further troubleshooting.
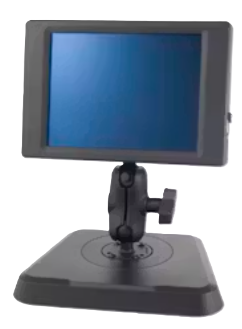
Product IDs:
- DRD8-FS - Free standing
- DRD8-PM- Panel Mount
Model number:
- ADR8
Features
- Compatible with ARES, Falcon, and F-series locators
- Over the air updates
- Bluetooth
- Wi-Fi/BT and Cellular/GPS
- Asset tracking (with myDCI registration and subscription)
- Supports fluid pressure monitoring
- Roll sequence assistance
Power source - cabled: 10-28 VDC
Current: 2.1 A maximum
Controls: touchscreen
Graphic display: 8.4-inch (21.34 cm) Full color LCD
Audio output: Speaker
Telemetry channels: 4
Telemetry range (1): 548.64 m
Bluetooth Frequencies:
- BLE: Frequency bands 2402-2480 MHz
- Transmit power: 0.00135 W EIRP
Operating temperature:-4°F to 140°F (-20°C to 60°C)
Dimensions (2): 7.63” X 7.63” X .68” (194.6 mm X 194.6mm X 17.1 mm)
Weight with stand (Free-standing, including stand): 6.56 lbs (2.98 kg)
Weight without stand (Panel mount): 3.74 lbs (1.7 kg)
Compatible locators: ARES, Falcon, F-series
Warranty period: One year from date of purchase
1 - Range can be increased with an optional long-range receiving antenna.
2 - Dimensions do not include mounting hardware.
Depth Increase in Inches (cm)
| % slope | Depth increase inches (cm) | % slope | Depth increase inches (cm) |
|---|---|---|---|
| 27 | 16.2 (41.1) | 41 | 24.6 (62.5) |
| 28 | 16.8 (42.7) | 42 | 25.2 (64.0) |
| 29 | 17.4 (44.2) | 43 | 25.8 (65.5) |
| 30 | 18.0 (45.7) | 44 | 26.4 (67.1) |
| 31 | 18.6 (47.2) | 45 | 27.0 (68.6) |
| 32 | 19.2 (48.8) | 46 | 27.6 (70.1) |
| 33 | 19.8 (50.3) | 47 | 28.2 (71.6) |
| 34 | 20.4 (51.8) | 50 | 30.0 (76.2) |
| 35 | 21.0 (53.3) | 55 | 33.0 (83.8) |
| 36 | 21.6 (54.9) | 60 | 36.0 (91.4) |
| 37 | 22.2 (56.4) | 70 | 42.0 (106.7) |
| 38 | 22.8 (57.9) | 80 | 48.0 (121.9) |
| 39 | 23.4 (59.4) | 90 | 54.0 (137.2) |
| 40 | 24.0 (61.0) | 100 | 60.0 (152.4) |
Slopes between 50% and 100% are provided for reference only and do not represent typical drilling conditions. All numbers are based on math only and do not take into account extremely soft or extremely hard soil conditions, which may cause depth values to vary.
Depth Increase in Inches (cm)
| % slope | Depth increase inches (cm) | % slope | Depth increase inches (cm) |
|---|---|---|---|
| 1 | 2 (5) | 16 | 28 (71) |
| 2 | 4 (10) | 17 | 30 (76) |
| 3 | 5 (13) | 18 | 32 (81) |
| 4 | 7 (18) | 19 | 34 (86) |
| 5 | 9 (23) | 20 | 35 (89) |
| 6 | 11 (28) | 21 | 37 (94) |
| 7 | 13 (33) | 22 | 39 (99) |
| 8 | 14 (36) | 23 | 40 (102) |
| 9 | 16 (41) | 24 | 42 (107) |
| 10 | 18 (46) | 25 | 44 (112) |
| 11 | 20 (51) | 26 | 45 (114) |
| 12 | 21 (53) | 27 | 47 (119) |
| 13 | 23 (58) | 28 | 49 (124) |
| 14 | 25 (64) | 29 | 50 (127) |
| 15 | 27 (69) | 30 | 52 (132) |
| % slope | Depth increase inches (cm) | % slope | Depth increase inches (cm) |
|---|---|---|---|
| 31 | 53 (135) | 43 | 71 (180) |
| 32 | 55 (140) | 44 | 72 (183) |
| 33 | 56 (142) | 45 | 74 (188) |
| 34 | 58 (147) | 46 | 75 (191) |
| 35 | 59 (150) | 47 | 77 (196) |
| 36 | 61 (155) | 50 | 80 (203) |
| 37 | 62 (157) | 55 | 87 (221) |
| 38 | 64 (163) | 60 | 93 (236) |
| 39 | 65 (165) | 70 | 103 (262) |
| 40 | 67 (170) | 80 | 112 (284) |
| 41 | 68 (173) | 90 | 120 (305) |
| 42 | 70 (178) | 100 | 127 (323) |
Slopes between 50% and 100% are provided for reference only and do not represent typical drilling conditions. All numbers are based on math only and do not take into account extremely soft or extremely hard soil conditions, which may cause depth values to vary.
Watch a selection of training videos or go to the full library of DigiTrak training videos at www.Youtube.com/DCIKent.
Some videos are only available in English. If needed, please turn on subtitles and automatic translations.
Watch video on YouTube:
Welcome to RD8: Our Next-Generation Remote Display - English (7:13 min)
Contact
DCI USA
19625 62nd Ave S, Suite B103
Kent, WA USA 98032
DCI@digital-control.com
1.800.288.3610
1.425.251.0559
DCI Australia
2/9 Frinton Street Southport
Queensland 4215 Australia
DCI.Australia@digital-control.com
+61.7.5531.4283
+61.7.5531.2617
DCI China PRC
368 Xingle Road Huacao Town
Minhang District Shanghai 201107 China
DCI.China@digital-control.com
+86.400.100.8708
+86.21.6432.5186
DCI Europe
Brückenstraße 2
97828 Marktheidenfeld Germany
DCI.Europe@digital-control.com
+49.9391.810.6100
+49.9391.810.6109
DCI India
Unit No. 1022, 10th Floor DLF Tower B Jasola District Center
New Delhi 110025 India
DCI.India@digital-control.com
+91.11.4507.0444
+91.11.4507.0440
DCI Philippines
404-405 Energy Opt. Bldg Prime St, Madrigal Business Park 2
Alabang Muntinlupa City 1780 Philippines
DCI.Philippines@digital-control.com
(02)79802647
+632-79802647